
Welcome to ScapeCrunch
We are ScapeCrunch, the place where planted aquarium hobbyists come to build relationships and support each other. When you're tired of doom scrolling, you've found your home here.
Social Feed

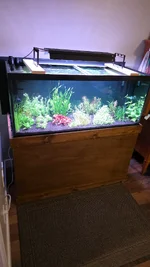
I recently set up my first big (to me) tank. I've been into this hobby for a couple of years but limited to a 20 gallon and a couple 10 gallon tanks in my office. I decided it was time to splurge and set up a nice 75 gallon system that can become a more appropriately-scaled Dutch tank. Here it is shortly after planting:
I like to save money where possible, so I ended up building my own tank stand as well as a Yugang reactor. I wanted to document these things to show everyone that it is quite attainable with a set of tools and a weekend of work.
So, here is the first post. Tank Stand Build:
When researching simple lumber stands, I found this great video:
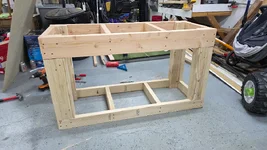
I used it as a guideline to build a simple dimensional lumber stand. My stand is 49" long, 19" wide, and 28" tall. This gives approximately 1/2" of clearance around the 75 gallon aquarium footprint and keeps the tank low enough that I can reach over the rim and touch the bottom substrate without straining. As shown in the photo, I used 2x6 lumber for the upper frame so that I could avoid using a centerspan support. This makes it so much easier to access the space under the tank. I used two 8ft 2x6 and six 8ft 2x4 studs. Total cost at home depot was under $50.
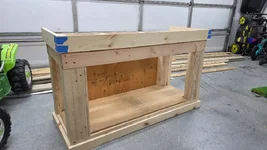
Once the structural frame was complete, I started thinking about how to dress it up as a piece of furniture that I didnt hate to have in my home. I ended up deciding to do a very simple trim with 1x3 boards on the bottom and 1x4 on the top. The top trim is offset upwards from the frame such that it covers the plastic trim on the tank when it is on the stand. I also used a piece of scrap plywood from my garage to act as a back panel and shear support to prevent racking of the frame. The 1x3 and 1x4 boards came out to $15
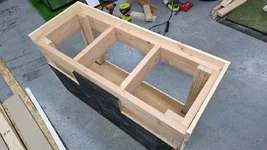
To finish it off, I bought a sheet of 1/8" "utility board" plywood for another $15. I cut it to wrap around the sides and front.
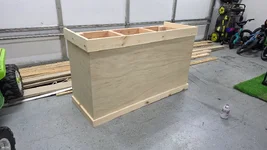
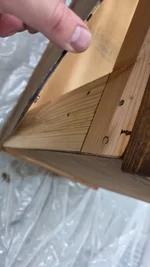
Now how to access the bottom? I thought about this a lot and ultimately decided on the cheapest/simplest/most lame approach. I bought some magnets from Harbor Freight for $5. I lucked out and these magnets were nearly the same size as the heads on the screws I used, so I simply put them on 4 corner screws and then added matching magnets on the front plywood panel at the 4 corners. It actually works really well and makes it simple to take the front panel off for filter access. It saved me hours of work and the cost of building actual cabinet doors, and I like how clean the final product ends up looking.
Lastly, I stained using dark walnut stain. Pine needs conditioner, so I did that first and then did one coat of stain. I then did about 4 coats of spray on oil-based polyurethane to seal it up.
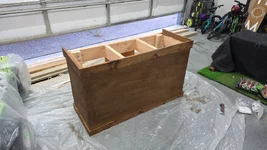
The last thing I did was add a sheet of styrofoam insulation on top of the frame to help even out any bumps in the lumber. I made it as flat as possible, but dimensional lumber is not meant for this kind of thing and has imperfections. The styrofoam is peace of mind for me to make sure the tank rim gets fully supported all the way around.
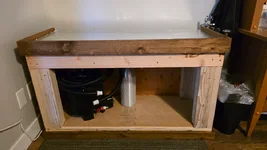
I'm really happy with how it turned out. Total cost for me was around $110, but I had some scrap plywood at home for the back panel and the bottom shelf where my filters sit. If you need to buy a sheet, figure another $40 bucks or so. Total time investment was maybe like 8 hours over the weekend and then the hours of waiting between coats of stain and poly. Tools used were a miter saw, circular saw, drill, driver, nailer, and sander.
I like to save money where possible, so I ended up building my own tank stand as well as a Yugang reactor. I wanted to document these things to show everyone that it is quite attainable with a set of tools and a weekend of work.
So, here is the first post. Tank Stand Build:
When researching simple lumber stands, I found this great video:
I used it as a guideline to build a simple dimensional lumber stand. My stand is 49" long, 19" wide, and 28" tall. This gives approximately 1/2" of clearance around the 75 gallon aquarium footprint and keeps the tank low enough that I can reach over the rim and touch the bottom substrate without straining. As shown in the photo, I used 2x6 lumber for the upper frame so that I could avoid using a centerspan support. This makes it so much easier to access the space under the tank. I used two 8ft 2x6 and six 8ft 2x4 studs. Total cost at home depot was under $50.
Once the structural frame was complete, I started thinking about how to dress it up as a piece of furniture that I didnt hate to have in my home. I ended up deciding to do a very simple trim with 1x3 boards on the bottom and 1x4 on the top. The top trim is offset upwards from the frame such that it covers the plastic trim on the tank when it is on the stand. I also used a piece of scrap plywood from my garage to act as a back panel and shear support to prevent racking of the frame. The 1x3 and 1x4 boards came out to $15
To finish it off, I bought a sheet of 1/8" "utility board" plywood for another $15. I cut it to wrap around the sides and front.
Now how to access the bottom? I thought about this a lot and ultimately decided on the cheapest/simplest/most lame approach. I bought some magnets from Harbor Freight for $5. I lucked out and these magnets were nearly the same size as the heads on the screws I used, so I simply put them on 4 corner screws and then added matching magnets on the front plywood panel at the 4 corners. It actually works really well and makes it simple to take the front panel off for filter access. It saved me hours of work and the cost of building actual cabinet doors, and I like how clean the final product ends up looking.
Lastly, I stained using dark walnut stain. Pine needs conditioner, so I did that first and then did one coat of stain. I then did about 4 coats of spray on oil-based polyurethane to seal it up.
The last thing I did was add a sheet of styrofoam insulation on top of the frame to help even out any bumps in the lumber. I made it as flat as possible, but dimensional lumber is not meant for this kind of thing and has imperfections. The styrofoam is peace of mind for me to make sure the tank rim gets fully supported all the way around.
I'm really happy with how it turned out. Total cost for me was around $110, but I had some scrap plywood at home for the back panel and the bottom shelf where my filters sit. If you need to buy a sheet, figure another $40 bucks or so. Total time investment was maybe like 8 hours over the weekend and then the hours of waiting between coats of stain and poly. Tools used were a miter saw, circular saw, drill, driver, nailer, and sander.
9 Replies
·
893 views


I have a wonderful stand of erio feather duster that has been algae free for well over a year.
Wnen I firts got it, tufts of bba would form on it on tips and I would just pull them off…
This summer my display tank has been struggling with simmering algae issues.
Still doing weekly 2/3 water changes, keeping nutrient levels and all stable, trimming away degraded leaves…
My erio is in sad shape…
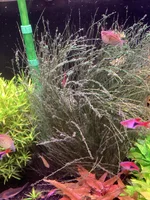
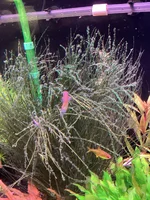
I have tried spraying peroxide on it when doing water changes, laying the mass on a cafeteria tray and spraying on full strength and letting it set for 10 minutes before refilling to no avail.
I gave the fikters a thorough cleaning out, andremoved and reset plant groupings after thoroughly gravel vaccing the bdbs to remove organics…
Iam starting to think giving the erio a good hair cut way down low and letting it send up all new leaves.
Figure I would poll the audience before taking any such action…
Wnen I firts got it, tufts of bba would form on it on tips and I would just pull them off…
This summer my display tank has been struggling with simmering algae issues.
Still doing weekly 2/3 water changes, keeping nutrient levels and all stable, trimming away degraded leaves…
My erio is in sad shape…
I have tried spraying peroxide on it when doing water changes, laying the mass on a cafeteria tray and spraying on full strength and letting it set for 10 minutes before refilling to no avail.
I gave the fikters a thorough cleaning out, andremoved and reset plant groupings after thoroughly gravel vaccing the bdbs to remove organics…
Iam starting to think giving the erio a good hair cut way down low and letting it send up all new leaves.
Figure I would poll the audience before taking any such action…
3 Replies
·
76 views

Staff member
I Donated 2026
Founding Member
Hello Welcome, TheBurn
Welcome to ScapeCrunch, @TheBurn!
We would love to get to know you. Please tell us about yourself. What tank do you have?
We would love to get to know you. Please tell us about yourself. What tank do you have?
0 Replies
·
7 views

Staff member
Supporting
I Donated 2026
Rockstar
PVAS Fall Fish Shrimp Plant and Dry Goods Auction is this Saturday!

Twice a year PVAS holds an All-Day Auction & Tag Sale: Auctions are free and open to the public.
Registration opens at 9:30 am, Tag Sale opens at 10:00 am, and auction bidding begins at 10:30 am. Sometimes there is a short break for lunch. Raffles usually occur about 1:00 pm and 3:00 pm. Bidding usually wraps up about 4:00 pm but continues until everything is sold.
All buyers and sellers must be registered at
 www.MyGroupAuctions.com.
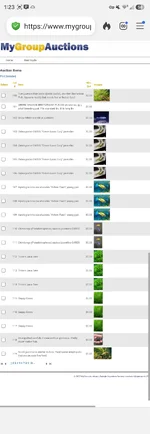
Sign in to see what's available! 14 pages of auction items are listed so far
Twice a year PVAS holds an All-Day Auction & Tag Sale: Auctions are free and open to the public.
Registration opens at 9:30 am, Tag Sale opens at 10:00 am, and auction bidding begins at 10:30 am. Sometimes there is a short break for lunch. Raffles usually occur about 1:00 pm and 3:00 pm. Bidding usually wraps up about 4:00 pm but continues until everything is sold.
All buyers and sellers must be registered at
www.MyGroupAuctions.com. Sign in to see what's available! 14 pages of auction items are listed so far
0 Replies
·
17 views

Supporting
I Donated 2026
Journal MrJG - UNS 90L
@Sb1415 Apologies I totally snagged the format of your journal post for this so thank you!
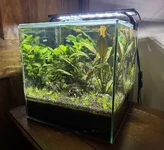
Many moons ago I was an active and contributing member on plantedtank.net, I think at one point I had around 14 scaped tanks going before burnout and life changes. Instead of weekends consisting of maintenance I transitioned to camping/boating and life has been great. I’ve always missed it. After downsizing and making a move to a new home I kept only a small 12x12 cube tank that started life as an amateur iwagumi layout, Seiryu and hairgrass only. I put it on the nightstand beside my bed and added some of my favorite Anubias and crypts from taken down tanks. Its been sitting there running for 5-6 years now, low light, top offs only w tap. Maintenance when it got out of control. Super old aquasoil now flattened out to a thick 4-5 inch thick layer in a perfect line front to back.
In Aug/Sept 25 had a bit of a health issue that kept me in bed for several weeks recovering while I looked at this sad little cube, mostly healthy but not truly thriving. No fertilizer being added for years, GDA covered anubias leaves that also were many years old and I thought to myself I should make this better… that was the tipping point. OK I’ll do a deep clean on the substrate, get some stems to throw in there, maybe get a carpet going. Tissue cultures/stems ordered and I got to work. No more top offs, 10% water changes instead. TDS ~900 when I started. Ultimately everything melted back and didn’t grow well. I’d been keeping the lighting so dim all these years to maintain just the crypts/epiphytes without it turning into a mess and I was ok with it again. That was the spark.
I decided I wanted to build out a new tank, most of my old hardware/tanks I had let go of in a bulk way so I was going to have to start new with everything sans some 5 gallon buckets of Amazonia that I’d placed in the basement of the new house.. Phoenix rising from the ashes? Most likely more like algae emerging from the depths. I still consider myself a beginner and maybe amateur at best so yeah…
So I got to work again reading, researching, what’s new, what has changed since I’ve been out of the loop for so long? Ooo dark start that sounds much better, in line CO2 diffusers cool! CO2 reactors, pretty awesome sounding, 2Hr aquarist read every article, and I’m back in baby!
Tank inspiration
None really hence no name, it fit right into a slot to occupy my mind from a not so great situation that I was in and I’m ok with that. Ultimately I’d like this to be a low-mid energy tank that can have minimal amounts of weekly maintenance while still looking the part. I’d prefer to keep it as simple as possible while still having some high tech bits. Get all the equipment out of the tank, co2, low-mid level lighting, minimal/simple fertilization. I got busy ordering equipment and started brainstorming layouts and what hardscape materials I could find. Instagram was my friend for a while, seems that everything that kept grabbing my attention were island style layouts with a very thin layer of sand surrounding. I’ve also always been partial to big chonky pieces of driftwood, I thought to go the manzanita route but wysiwyg pieces were fetching stupid prices. I ran across this ironwood in a listing and couldn’t let it go. The deep lines in the bark were just calling me so I quick snap ordered it before my brain could process dimensions, I knew it would fit but didn’t fully visualise how much it would ultimately limit the layout. I wanted to stay mostly inert with stone and eventually/begrudgingly ordered the tumbled lava stone with the intention of keeping it to a island/river layout style and mimicking some of my found instagram muse tanks. It will mostly likely end up more nature style although the start will be more Willy Wonka than anything. Thanks @Burr740 for that, I shopped like a kid in a candy store.
Equipment
Tank

Many moons ago I was an active and contributing member on plantedtank.net, I think at one point I had around 14 scaped tanks going before burnout and life changes. Instead of weekends consisting of maintenance I transitioned to camping/boating and life has been great. I’ve always missed it. After downsizing and making a move to a new home I kept only a small 12x12 cube tank that started life as an amateur iwagumi layout, Seiryu and hairgrass only. I put it on the nightstand beside my bed and added some of my favorite Anubias and crypts from taken down tanks. Its been sitting there running for 5-6 years now, low light, top offs only w tap. Maintenance when it got out of control. Super old aquasoil now flattened out to a thick 4-5 inch thick layer in a perfect line front to back.
In Aug/Sept 25 had a bit of a health issue that kept me in bed for several weeks recovering while I looked at this sad little cube, mostly healthy but not truly thriving. No fertilizer being added for years, GDA covered anubias leaves that also were many years old and I thought to myself I should make this better… that was the tipping point. OK I’ll do a deep clean on the substrate, get some stems to throw in there, maybe get a carpet going. Tissue cultures/stems ordered and I got to work. No more top offs, 10% water changes instead. TDS ~900 when I started. Ultimately everything melted back and didn’t grow well. I’d been keeping the lighting so dim all these years to maintain just the crypts/epiphytes without it turning into a mess and I was ok with it again. That was the spark.
I decided I wanted to build out a new tank, most of my old hardware/tanks I had let go of in a bulk way so I was going to have to start new with everything sans some 5 gallon buckets of Amazonia that I’d placed in the basement of the new house.. Phoenix rising from the ashes? Most likely more like algae emerging from the depths. I still consider myself a beginner and maybe amateur at best so yeah…
So I got to work again reading, researching, what’s new, what has changed since I’ve been out of the loop for so long? Ooo dark start that sounds much better, in line CO2 diffusers cool! CO2 reactors, pretty awesome sounding, 2Hr aquarist read every article, and I’m back in baby!
Tank inspiration
None really hence no name, it fit right into a slot to occupy my mind from a not so great situation that I was in and I’m ok with that. Ultimately I’d like this to be a low-mid energy tank that can have minimal amounts of weekly maintenance while still looking the part. I’d prefer to keep it as simple as possible while still having some high tech bits. Get all the equipment out of the tank, co2, low-mid level lighting, minimal/simple fertilization. I got busy ordering equipment and started brainstorming layouts and what hardscape materials I could find. Instagram was my friend for a while, seems that everything that kept grabbing my attention were island style layouts with a very thin layer of sand surrounding. I’ve also always been partial to big chonky pieces of driftwood, I thought to go the manzanita route but wysiwyg pieces were fetching stupid prices. I ran across this ironwood in a listing and couldn’t let it go. The deep lines in the bark were just calling me so I quick snap ordered it before my brain could process dimensions, I knew it would fit but didn’t fully visualise how much it would ultimately limit the layout. I wanted to stay mostly inert with stone and eventually/begrudgingly ordered the tumbled lava stone with the intention of keeping it to a island/river layout style and mimicking some of my found instagram muse tanks. It will mostly likely end up more nature style although the start will be more Willy Wonka than anything. Thanks @Burr740 for that, I shopped like a kid in a candy store.
Equipment
Tank
- UNS 90L
- 90 cm x 30 cm x 30 cm
- 79 liters or 21 gallons by volume, 62.5 liters or 16.5 gallons actual w hardscape
- Oase Thermo 200
- Replaced the charcoal media with more ceramic from Oase
- Replaced w Fzone stainless steel -Fzone glass Lily w skimmer ⅝”
- Replaced tubing with UNS pro tubing ⅝”
- Fzone Quick release ⅝” so Lily pipes can be cleaned without having to reprime filter
- Gla inline atomizer - replaced Fzone Co2 inline diffuser ⅝”
- GLA dual stage - replaced Fzone pro series dual stage regulator w/ 5lb tank
- Timed on 3 hours before lights on, off 1 hour before lights off
- Using distilled by gallon, remineralized with salty shrimp GH targeting GH around 4-5
- Hoping for 0-1 KH
- Dark start cycled with prime dechlorinated Tap and APT Start
- 80% old used ADA Amazonia v1, small bits sifted and bagged to create slight slope
- 2HR Feast topped to around 2 inches
- UNS Bora sand
- UNS Kona pebbles
- Fzone Bright 90 - 90CM
- Before hardscape made rough par map using photone with diffuser iPhone 15 Pro
- At 100% top 404, mid 219, base 127 PAR
- At 50% top 190, mid 110, base 62 PAR
- Will be starting tank with 45-50% lighting intensity
- Timed at 3pm-9pm photoperiod with 60 minute ramps
- Current Colorcast LED strip w/frosted background
- Timed scenes for dawn (orange 1 HR during pre-ramp) /daylight (green during ON cycle) /sunset (red 1 HR during post-ramp) /night (indigo 1 HR after lights out)
- Arizona Ironwood
- Black tumbled lava stone
- APT 1 and 3 dosed at recommended levels per calculator
- APT Jazz - in 3-4 months as Feast gives out
- Trying to keep it simple with fertilization to start
52 Replies
·
5142 views

Rockstar
Journal 62G AIO Dirty Soil Lagoon

Well I’m done talking about it, it’s time to get this journal started.
I have been really out of it the last year or so in terms of maintaining my own tank, mainly out of frustration with time constraints and inconsistency with dosing etc. However, I have now acquired a dream tank, rimless and with low iron glass like I’ve always wanted. While I loved having a sump and prided myself on putting it together, I’m past that desire. The AIO allows the same benefits with hiding equipment, and overall easier maintenance without climbing in and out of cabinets. Now onto the details of this build.
Tank: Planet Aquariums Tideline 62 Gallon AIO Lagoon
Filtration: (2) 250gph pumps on either side of the tank with center overflow into socks (I’m going to punch holes in the socks for now and stuff with polyfill, reviews state the socks clog way too quickly and there is no replacement sock as the insert is not the common round style). The baffles will be stuffed with the poret foam I have already from my sump for extra mechanical/biological.
Substrate: The bottom layer will comprise of bagged pond soil/peat/earthworm castings/ STS. This will be a thin layer and will mainly act as filler to raise up the cap of APT Feast. This is similar to a substrate setup I did when I first started back up in 2020, And that tank did very well. While capping with sand and relying on the dirt to feed the stems worked well, it did require a little more effort on my end with dosing. I don’t trust myself to be as diligent as some members on here are with their inert subs, so I’m taking the mulligan and using aquasoil as a cap, hence, “dirty soil.” This will be another island style layout, and the surrounding substrate will be comprised of Caribsea Carolina Creek Sand.
Hardscape: River rock (local hardscape center sourced) and malaysian driftwood. I have recently acquired another large piece of wood and I’m sourcing new stone this week, as what I have just isn’t meshing with my current vision for the tank.
Plants: …. I have not solidified my vision of what this scape will look like just yet as I haven’t been able to setup the hardscape to outline the island. The plan is to use a good amount of colorful stems, epiphytes, and potentially moss.
Lighting: I will be ordering the Week Aqua Z400 this week and am excited to test it out.
That’s all for now, more pictures and details to come. I should hopefully have the hardscape setup by the end of this coming week after acquiring more stone and wood.
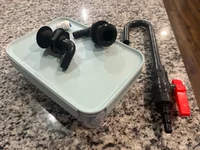
CO2: Almost forgot, for Co2 injection I have made a DIY Yugang with a locking food storage container. It will be stored in the cabinet and the hook will feed into the return pump chamber on the right. I initially was bummed that I had to sacrifice storage to fit a 5lb CO2 tank under the stand, which also meant getting rid of of the 20lb tank I’ve only been having to fill twice a year. @GreggZ Will appreciate this, my awesome father in law suggested that I hide the co2 tank in the pantry closet which is directly behind that wall and just drill a hole for the co2 line. Since my father in laws word is pure gold in my wife’s eyes, that suggestion was approved! He’s just as much my dad too so I appreciated him supporting the project

66 Replies
·
4593 views

Supporting
I Donated 2026
Rockstar
I hadn't seen it mentioned by others that attended Aquashella, but if you hadn't already heard about it or seen it in Aquashella videos, ADA has come out with Amazonia Pro. It's not a replacement for Version 2, but an addition. It is essentially Version 2 on steroids with higher nutrients and of course the negative side effect of potentially higher initial ammonia leaching and, if your not prepared and skilled, more chance of algae. That's even from the mouth of Homma-san himself. The scaping competitors were using it in the competition and AFA was selling 9l bags at the show. They said it would be available on the website within the next couple weeks.
19 Replies
·
222 views
Staff member
I Donated 2026
Founding Member
Hello Welcome, Rachel Smith
Welcome to ScapeCrunch, @Rachel Smith!
We would love to get to know you. Please tell us about yourself. What tank do you have?
We would love to get to know you. Please tell us about yourself. What tank do you have?
0 Replies
·
15 views
Staff member
I Donated 2026
Founding Member
Question of the Day UV Sterilizers - good or bad for planted aquariums?

So they have been around for ages and there is no doubt that they do work. I have a hang on one that I will bring out if I ever get a green water outbreak, ich or other issue that I think it can solve. I think many of us have one in our "aquarium stuff" pile.
The question is, should we run them continuously? There is a school of thought out there that thinks this impacts our fertilizers so they shouldn't be used continuously. Any thoughts on this?
How about if you're keeping sensitive fish like our friend @BryceM? Discus are real sensitive to bacteria. Would you run a sterilizer 24/7?
Would love to get your thoughts on this?
P.S., these questions of the day are intended to get us talking to each other. If you see this, please give your 2 cents even if it is "I have no idea". Our community will be better for it.
20 Replies
·
2865 views
Supporting
I Donated 2026
Rockstar
Well...let's spend more money! I had thought about attending Aquashella - Chicago a few months ago but decided to pass this year. When I was thinking about it, they still didn't have the specific VIP guest list posted. Out of curiosity, I checked today and to my surprise, the man himself, Yusuke Homma, will be presenting the masterclass on Saturday. I can't pass that up when it's only an 8 hour drive. Ticket purchased, room booked. Anyone else attending?
23 Replies
·
628 views

Supporting
I Donated 2026
Rockstar
Browsed the Sreepadma booth at Aquashella briefly today. I'd not heard of them but they are the largest aquatic plant farm in India and have been selling their TC offerings in the US for about 2 years. I was actually impressed with the qualty I was seeing of their TC cups and wish I had room in a tank for some (and some ADA TC). Has anyone else purchased any of their plants. One of the first that I spotted was Red Tiger Crypt which was a coincidence since we have a thread discussing it.
8 Replies
·
175 views