
Welcome to ScapeCrunch
We are ScapeCrunch, the place where planted aquarium hobbyists come to build relationships and support each other. When you're tired of doom scrolling, you've found your home here.
Social Feed

I Donated 2026
Been meaning to write this up for a while, so here it is. Over the last few months I've built a full custom controller setup for my 130L planted, CO2 injected tank, running on three ESP32 boards working together. It replaced an ageing Up Aqua CO2/pH controller and turned into a genuinely complete automation system for water changes, dosing, CO2, top-off, and reservoir monitoring. Sharing the overview here in case it's useful or interesting to anyone else down a similar rabbit hole.
Three boards, each with its own job:
They talk to each other over WiFi and three deliberate hardwired links for the communications that genuinely shouldn't depend on the network as they are safety critical.
Weekly, fully automated. Connect a line from the WaterDrop filter, a drain line that goes outside to the garden or lawn (both with quick connects and manual valves for safety), choose your water change volume in litres, press start and it then:
- runs through safety prompts to ensure everything is connected and safety valves are set correctly.
-prompts to clean prefilters
-prompts to measure remineralisers (calculated on screen, based on your water change volume selection).
-it then drains and refills with RO water. It also turns off/ on smart plugs so skimmers, co2, heaters ect are off for draining then start to turn them on as water fill reaches certain thresholds.
- It doses potassium bicarbonate for KH, calcium and magnesium sulfate for GH, and boosts macros (nitrate, phosphate, potassium, micros), again, all scaled to my actual water change volume.
Everything's logged, every step confirmed before moving to the next, with a wizard-style setup so I can adjust the fill amount, KH target, and anything else on the fly.
I also get phone updates, the fill solenoid is connected with a flow rate sensor, temperature probe and TDS sensor. So every 10L I get an update on the flow rate, tds and temperature of that 10L fill and average so far, so I can spot any issues. It will also abort the water change, stop filter.
I have also put a weight sensor under my CO2 bottle so it tells me how full/empty my co2 bottle is and predicts refill date based on useage (this is untested as it's still so new, I don't have the data for it to be accurate.)
Four channel dosing pump, fully scripted daily doses plus automatic post-water-change boosts, calculated from my actual verified nutrient targets rather than rough guesses. Doses are triggered automatically the moment a water change finishes.
For now, the auto top-off unit itself does the actual work, but the controller now watches the reservoir independently, a proper pressure-based level sensor for the real litre count, plus a simple mechanical float as a dumb, sensor-agnostic backup. If the float ever trips, ATO shuts down immediately and I get a notification, worded differently depending on whether the pressure sensor agrees with the float or not, since a disagreement between the two usually points at the pressure sensor itself needing a look rather than a genuinely empty reservoir. I have some optical sensors on the way, and hopefully by next week the controller is running the ATO independently.
A small but genuinely nice touch. Feeding pauses CO2 injection, filter and skimmer automatically, it's voice activated or you can use a unit mounted button, and the front panel readouts switch to a simple "feeding" display while the filter's off, since the normal sensor numbers would be meaningless with no flow through the lines anyway.
Everything logs to a Grafana dashboard, I have pH, temperature, TDS, reservoir level se sors, it also logs CO2 state, with history of all controller actions that I can actually look back through rather than just a live snapshot. Genuinely useful for spotting slow trends, not just catching sudden problems.
If there's one thing I'd want someone building something similar to take away, it's this. Every automated system that can act on its own needs to fail toward safe, not just work correctly when everything's fine.
A few of the principles that ended up running through the whole build:
The short version
Three boards, each with its own job:
- Water change controller — drains, refills, remineralises, and doses the tank automatically, sitting mostly idle between weekly changes.
- Tank controller — the brains of day-to-day operation, running CO2/pH control, top-off monitoring, the reservoir, and a small front panel with live readouts.
- Alexa bridge — ties the whole thing into Alexa for voice control and equipment scenes, and handles the feeding routine.
They talk to each other over WiFi and three deliberate hardwired links for the communications that genuinely shouldn't depend on the network as they are safety critical.
Water changes
Weekly, fully automated. Connect a line from the WaterDrop filter, a drain line that goes outside to the garden or lawn (both with quick connects and manual valves for safety), choose your water change volume in litres, press start and it then:
- runs through safety prompts to ensure everything is connected and safety valves are set correctly.
-prompts to clean prefilters
-prompts to measure remineralisers (calculated on screen, based on your water change volume selection).
-it then drains and refills with RO water. It also turns off/ on smart plugs so skimmers, co2, heaters ect are off for draining then start to turn them on as water fill reaches certain thresholds.
- during refil it remineralises to target GH and KH from a container with a magnetic stirrer with a perialstatic dosing pump that fires at set percentages of fill.
- it then connects to my Chihiros dosing pumps and fires the dosing boosts to preload nutrients (again these doses are scaled with selected water change volume)
- It doses potassium bicarbonate for KH, calcium and magnesium sulfate for GH, and boosts macros (nitrate, phosphate, potassium, micros), again, all scaled to my actual water change volume.
Everything's logged, every step confirmed before moving to the next, with a wizard-style setup so I can adjust the fill amount, KH target, and anything else on the fly.
I also get phone updates, the fill solenoid is connected with a flow rate sensor, temperature probe and TDS sensor. So every 10L I get an update on the flow rate, tds and temperature of that 10L fill and average so far, so I can spot any issues. It will also abort the water change, stop filter.
CO2 and pH
This was the original reason the whole project started. My old analogue controller had a pretty coarse hysteresis, and in low KH water even small CO2 swings move pH more than I'd like. The new controller runs a proper pH probe on a scheduled window, targets a specific pH with a tight, tunable hysteresis, and logs everything continuously. It also catches things a dumb timer never could, a sudden pH crash with the solenoid already closed pointed straight at a CO2 regulator dumping its tank, something I'd never have caught otherwise until it was a much bigger problem. The Atlas Ezo ph sensor setup is elite and far more accurate than my previous setup. I can also see live updates, get phone alerts for certain events and have set safety alets and shutoffs for events like rapid changes in ph.I have also put a weight sensor under my CO2 bottle so it tells me how full/empty my co2 bottle is and predicts refill date based on useage (this is untested as it's still so new, I don't have the data for it to be accurate.)
Dosing
Being sick of the Chihiros app occasionally being unavailable this year, I have given over control of the scheduling and setup to my controller. I have my own dashboard and phone app that does this now and can send schedules and settings to the Chihiros pumps. It has taken some trial error and bluetooth sniffing apps to work this out but it is rock solid now.Four channel dosing pump, fully scripted daily doses plus automatic post-water-change boosts, calculated from my actual verified nutrient targets rather than rough guesses. Doses are triggered automatically the moment a water change finishes.
Top-off and reservoir
For now, the auto top-off unit itself does the actual work, but the controller now watches the reservoir independently, a proper pressure-based level sensor for the real litre count, plus a simple mechanical float as a dumb, sensor-agnostic backup. If the float ever trips, ATO shuts down immediately and I get a notification, worded differently depending on whether the pressure sensor agrees with the float or not, since a disagreement between the two usually points at the pressure sensor itself needing a look rather than a genuinely empty reservoir. I have some optical sensors on the way, and hopefully by next week the controller is running the ATO independently.
Feeding
A small but genuinely nice touch. Feeding pauses CO2 injection, filter and skimmer automatically, it's voice activated or you can use a unit mounted button, and the front panel readouts switch to a simple "feeding" display while the filter's off, since the normal sensor numbers would be meaningless with no flow through the lines anyway.
Remote monitoring
Everything logs to a Grafana dashboard, I have pH, temperature, TDS, reservoir level se sors, it also logs CO2 state, with history of all controller actions that I can actually look back through rather than just a live snapshot. Genuinely useful for spotting slow trends, not just catching sudden problems.
Alexa integration
Voice control for scenes around water changes, changing settings and feeding, equipment turning off and on automatically at the right points in each process, and a physical feed button that fires the exact same routine as the voice command.Safety, and why it mattered more than any single feature
If there's one thing I'd want someone building something similar to take away, it's this. Every automated system that can act on its own needs to fail toward safe, not just work correctly when everything's fine.
A few of the principles that ended up running through the whole build:
- Solenoids fail closed. Power loss means CO2 and water stay off, never on, by hardware design, not firmware logic that could have a bug in it.
- A tripped safety condition can't be quietly dismissed. If something raises an alert, like the backup float, you can acknowledge it, but the system won't let you clear it while the actual problem is still physically present. No accidentally waving away a real fault.
- The one link that has to work regardless of WiFi, does. CO2 and ATO pausing during a water change runs over a direct hardwired connection between boards, not the network. Everything else can be a bit more relaxed about connectivity; that one thing can't be.
- A backup sensor's only job is to disagree usefully. The float switch isn't there to be a second source of truth, it's there to catch the primary sensor being wrong. When they disagree, the alert tells me which one to actually go check.
- Never power anything from two sources at once. Learned that one the hard way, destroyed a board's regulator early on doing exactly that. So it now has wifi firmware updates for each board, to save the USB input power when updating by PC
None of this was designed perfectly the first time either, more caught through actually running it and paying attention than getting it right on paper up front. A few genuine bugs this build taught me: features that were fully coded but sitting behind a switch I'd forgotten to flip on, so they looked complete but never actually ran; a menu screen that could lose progress if you walked away at the wrong moment during a slow calibration step. Both fixed once they showed up in real use, which is really the whole point of building it in stages rather than all at once and hoping. I have spent weeks finding and squashing bugs before I have given over control of the tank to it.
Next on the list:
Heater/fan control, full ATO control, uninteruptable power unit uninterruptible that alerts me to power outages and turns on air pumps.
It is also in a pretty basic case and the cutouts are purposely oversized. I have ordered smoked acrylic to 'wrap' it in so it appears to be black rectangular box, with only the LED parameter readouts (temp, pH, TDS and ATO reservoir litres) visible through the smoke tinted acrylic and the two black control knobs that wake sleeping OLED screens, all other controls will be behind hinged flaps. I want to make sure all the sensors etc are wired correctly though before I wrap and anchor wiring.
The great thing is, every time I think of something I want to add, it is a coding session with the help of AI and finding the sensors or equipement required. I can wake up with an idea and genuinely have it implemented with an hour or two of soldering and coding. It fits my tank like a glove and is infinitely adaptable. menu setup and setting options all added as I think of them!
I will add some pictures below of the in progress build! I wanted to share in case anyone is thinking of doing the same, with the prices of ESP32s and the sensors (except for the Atlas Ezo chips! which are expensive but well worth it!) it is definitely a project in reach of anyone with a basic idea of code and soldering.
27 Replies
·
1360 views


Supporting
I Donated 2026
Rockstar
Browsed the Sreepadma booth at Aquashella briefly today. I'd not heard of them but they are the largest aquatic plant farm in India and have been selling their TC offerings in the US for about 2 years. I was actually impressed with the qualty I was seeing of their TC cups and wish I had room in a tank for some (and some ADA TC). Has anyone else purchased any of their plants. One of the first that I spotted was Red Tiger Crypt which was a coincidence since we have a thread discussing it.
8 Replies
·
120 views
Supporting
I Donated 2026
Rockstar
I hadn't seen it mentioned by others that attended Aquashella, but if you hadn't already heard about it or seen it in Aquashella videos, ADA has come out with Amazonia Pro. It's not a replacement for Version 2, but an addition. It is essentially Version 2 on steroids with higher nutrients and of course the negative side effect of potentially higher initial ammonia leaching and, if your not prepared and skilled, more chance of algae. That's even from the mouth of Homma-san himself. The scaping competitors were using it in the competition and AFA was selling 9l bags at the show. They said it would be available on the website within the next couple weeks.
12 Replies
·
54 views

Rockstar
Journal 62G AIO Dirty Soil Lagoon

Well I’m done talking about it, it’s time to get this journal started.
I have been really out of it the last year or so in terms of maintaining my own tank, mainly out of frustration with time constraints and inconsistency with dosing etc. However, I have now acquired a dream tank, rimless and with low iron glass like I’ve always wanted. While I loved having a sump and prided myself on putting it together, I’m past that desire. The AIO allows the same benefits with hiding equipment, and overall easier maintenance without climbing in and out of cabinets. Now onto the details of this build.
Tank: Planet Aquariums Tideline 62 Gallon AIO Lagoon
Filtration: (2) 250gph pumps on either side of the tank with center overflow into socks (I’m going to punch holes in the socks for now and stuff with polyfill, reviews state the socks clog way too quickly and there is no replacement sock as the insert is not the common round style). The baffles will be stuffed with the poret foam I have already from my sump for extra mechanical/biological.
Substrate: The bottom layer will comprise of bagged pond soil/peat/earthworm castings/ STS. This will be a thin layer and will mainly act as filler to raise up the cap of APT Feast. This is similar to a substrate setup I did when I first started back up in 2020, And that tank did very well. While capping with sand and relying on the dirt to feed the stems worked well, it did require a little more effort on my end with dosing. I don’t trust myself to be as diligent as some members on here are with their inert subs, so I’m taking the mulligan and using aquasoil as a cap, hence, “dirty soil.” This will be another island style layout, and the surrounding substrate will be comprised of Caribsea Carolina Creek Sand.
Hardscape: River rock (local hardscape center sourced) and malaysian driftwood. I have recently acquired another large piece of wood and I’m sourcing new stone this week, as what I have just isn’t meshing with my current vision for the tank.
Plants: …. I have not solidified my vision of what this scape will look like just yet as I haven’t been able to setup the hardscape to outline the island. The plan is to use a good amount of colorful stems, epiphytes, and potentially moss.
Lighting: I will be ordering the Week Aqua Z400 this week and am excited to test it out.
That’s all for now, more pictures and details to come. I should hopefully have the hardscape setup by the end of this coming week after acquiring more stone and wood.
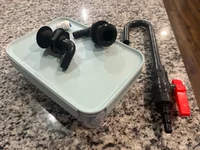
CO2: Almost forgot, for Co2 injection I have made a DIY Yugang with a locking food storage container. It will be stored in the cabinet and the hook will feed into the return pump chamber on the right. I initially was bummed that I had to sacrifice storage to fit a 5lb CO2 tank under the stand, which also meant getting rid of of the 20lb tank I’ve only been having to fill twice a year. @GreggZ Will appreciate this, my awesome father in law suggested that I hide the co2 tank in the pantry closet which is directly behind that wall and just drill a hole for the co2 line. Since my father in laws word is pure gold in my wife’s eyes, that suggestion was approved! He’s just as much my dad too so I appreciated him supporting the project

64 Replies
·
4466 views
Supporting
I Donated 2026
Rockstar
Well...let's spend more money! I had thought about attending Aquashella - Chicago a few months ago but decided to pass this year. When I was thinking about it, they still didn't have the specific VIP guest list posted. Out of curiosity, I checked today and to my surprise, the man himself, Yusuke Homma, will be presenting the masterclass on Saturday. I can't pass that up when it's only an 8 hour drive. Ticket purchased, room booked. Anyone else attending?
22 Replies
·
515 views

Journal High-Tech 90P Build
Hi guys!
I'm new here, but not entirely new to planted tanks though I've been out of the hobby for the better part of the last decade between kids and moving a couple of times - but finally in a spot where I can do something again. I'm mostly going to be making things up as I go along, but plan on a lot of automation (I want to integrate everything into home assistant) and a lot of DIY as I love the challenge of building things out myself.
The starting point:
I picked up a 90P rimless, low-iron tank on a great deal.
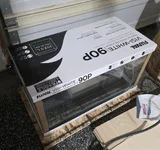
I have a rough idea in my head for a stand to be built from plywood - just have a couple other house projects to finish off before starting that built.
Wife says I can only have one aquarium, so for this tank, I want to go all out with a sump to allow for auto top off, and auto water changes, auto fertilizer dosing etc. etc. I have half a plan in my mind.
I've also started on the light fixture which I've modeled up in CAD, and plan on making out of an 8020 extrusion, and some 3D printed bits.
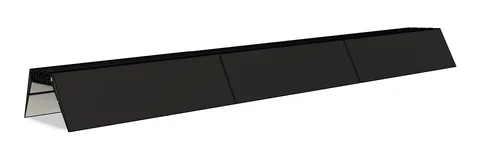
I'm using bridgelux gen 3 thrive CW (3000k) and WW (5000k) LED strips which have super high CRI at 98+ along with some specific XPE2 wavelengths that I'll solder onto some starboards. Far Red (730nm), Red (654nm), Cyan (495nm), Blue (455nm), Visible UV (415nm). Each segment of the white channels will be on its own driver so I can adjust left to right brightness in thirds, and each colour channel on its own driver so I can vary each channel on a time-based approach.
These will be run from a custom PCB board with Meanwell N-LDD drivers, and will run ESPHome on an ESP32 so it can link up with my Home Assistant installation.
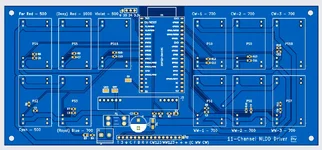
That's it for now, this will probably be a very slow build so be warned if you follow along!
I'm new here, but not entirely new to planted tanks though I've been out of the hobby for the better part of the last decade between kids and moving a couple of times - but finally in a spot where I can do something again. I'm mostly going to be making things up as I go along, but plan on a lot of automation (I want to integrate everything into home assistant) and a lot of DIY as I love the challenge of building things out myself.
The starting point:
I picked up a 90P rimless, low-iron tank on a great deal.
I have a rough idea in my head for a stand to be built from plywood - just have a couple other house projects to finish off before starting that built.
Wife says I can only have one aquarium, so for this tank, I want to go all out with a sump to allow for auto top off, and auto water changes, auto fertilizer dosing etc. etc. I have half a plan in my mind.
I've also started on the light fixture which I've modeled up in CAD, and plan on making out of an 8020 extrusion, and some 3D printed bits.
I'm using bridgelux gen 3 thrive CW (3000k) and WW (5000k) LED strips which have super high CRI at 98+ along with some specific XPE2 wavelengths that I'll solder onto some starboards. Far Red (730nm), Red (654nm), Cyan (495nm), Blue (455nm), Visible UV (415nm). Each segment of the white channels will be on its own driver so I can adjust left to right brightness in thirds, and each colour channel on its own driver so I can vary each channel on a time-based approach.
These will be run from a custom PCB board with Meanwell N-LDD drivers, and will run ESPHome on an ESP32 so it can link up with my Home Assistant installation.
That's it for now, this will probably be a very slow build so be warned if you follow along!
69 Replies
·
4575 views

I have a wonderful stand of erio feather duster that has been algae free for well over a year.
Wnen I firts got it, tufts of bba would form on it on tips and I would just pull them off…
This summer my display tank has been struggling with simmering algae issues.
Still doing weekly 2/3 water changes, keeping nutrient levels and all stable, trimming away degraded leaves…
My erio is in sad shape…
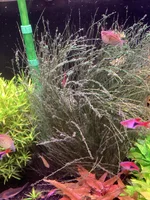
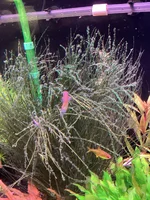
I have tried spraying peroxide on it when doing water changes, laying the mass on a cafeteria tray and spraying on full strength and letting it set for 10 minutes before refilling to no avail.
I gave the fikters a thorough cleaning out, andremoved and reset plant groupings after thoroughly gravel vaccing the bdbs to remove organics…
Iam starting to think giving the erio a good hair cut way down low and letting it send up all new leaves.
Figure I would poll the audience before taking any such action…
Wnen I firts got it, tufts of bba would form on it on tips and I would just pull them off…
This summer my display tank has been struggling with simmering algae issues.
Still doing weekly 2/3 water changes, keeping nutrient levels and all stable, trimming away degraded leaves…
My erio is in sad shape…
I have tried spraying peroxide on it when doing water changes, laying the mass on a cafeteria tray and spraying on full strength and letting it set for 10 minutes before refilling to no avail.
I gave the fikters a thorough cleaning out, andremoved and reset plant groupings after thoroughly gravel vaccing the bdbs to remove organics…
Iam starting to think giving the erio a good hair cut way down low and letting it send up all new leaves.
Figure I would poll the audience before taking any such action…
1 Replies
·
21 views

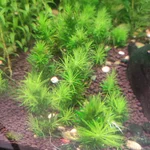 How long does it take for this plant to convert from emersed to submerged? I've had these for a month and this is what it looks like. A bit of new growth, but I don't know if it's normal to wait that long or if it's stunting. The emersed stems were tiny also.
Another general query is what is your general experience with the plant?
10 Replies
·
533 views

Supporting
I Donated 2026
Rockstar
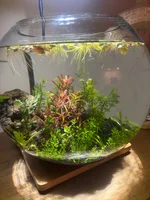
Inspired by @Naturescapes_Rocco ’s no-tech bowl thread, I decided to set up something similar.
With all the highs and lows of running a high-tech planted tank, I was hoping to put together something much simpler—a small bowl with no filter, no CO₂, and minimal equipment.
12" diameter × 10" height
Approximately 3 gallons
5 watts
At the end of the two weeks, ammonia remained super high.
I eventually got impatient, did about a 90% water change, and planted the bowl.
Current plants include:
A 75% water change takes less than 10 minutes.
For the last couple of weeks after planting, I’ve been doing water changes approximately every 2–3 days.
Maybe it’s the fresh aquasoil, but the pH has been sitting around 6.6. For comparison, my main high-tech tank with APT Feast (about a year old) sits around pH 7 before the CO₂ comes on.
Plant growth has been surprisingly good. I also frequently see the plants pearling, which I wasn’t necessarily expecting from a little no-tech setup like this. The L.heterophylla has been trimmed once.
What has been particularly interesting is how easily plants taken directly from my high-tech tank seem to have transitioned to these very different conditions.
A bladder snail somehow hitchhiked in with the plants. It seems perfectly happy and has already started reproducing.
With the relatively low pH, I suspect much of the measured ammonia is present as the less-toxic ammonium form, which may also explain why the snail seems completely unbothered.
I am starting to see the power of frequent water changes with the lack of algae so far (fingers crossed).
For such a small volume of water, APT Feast may simply be more nutrient-rich than necessary. I’m curious to see how things evolve once the bowl matures.
2. Choose a different light.
The light itself works fine, but the built-in timer is frustrating.
If I turn the light on at night just to look at the bowl, it interrupts the timer cycle, and I then have to reset it the following day.
I’m not particularly handy with electrical work, but ideally I’d love a simple light that could just be plugged into a Kasa smart plug and controlled externally.
If anyone has recommendations for a good small bowl light that works that way, let me know.
Overall, though, I’m really enjoying the simplicity of this setup so far.
Looking forward to letting it mature a little more and hopefully adding some red cherry shrimp soon.
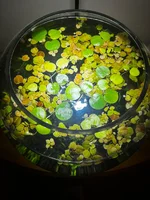
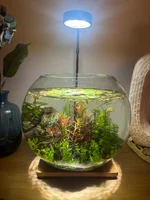
With all the highs and lows of running a high-tech planted tank, I was hoping to put together something much simpler—a small bowl with no filter, no CO₂, and minimal equipment.
Bowl
WGV Large Glass Bowl Vase12" diameter × 10" height
Approximately 3 gallons
Light
AREPK Aquarium & Terrarium Full Spectrum LED5 watts
Substrate / Hardscape
- APT Feast
- A single lava rock
Water
RO water remineralized with APT SkyFertilizer
None so far.Dark Start
I did a dark start for about 2 weeks after squeezing some mulm from an established filter into the bowl.At the end of the two weeks, ammonia remained super high.
I eventually got impatient, did about a 90% water change, and planted the bowl.
Plants
My initial goal was to use relatively fast-growing plants to help stabilize the system. Some of these may not necessarily remain in the bowl long term.Current plants include:
- Limnophila heterophylla
- Pearlweed
- Rotala ‘Blood Red’
- Helanthium tenellum
- Trident Java fern
- Mini Bolbitis
- A few assorted stems from my main tank
- Some nice floating plants
Water Changes
One of the biggest advantages of a bowl this size is how easy maintenance is.A 75% water change takes less than 10 minutes.
For the last couple of weeks after planting, I’ve been doing water changes approximately every 2–3 days.
Experience So Far
So far, the water has remained crystal clear.Maybe it’s the fresh aquasoil, but the pH has been sitting around 6.6. For comparison, my main high-tech tank with APT Feast (about a year old) sits around pH 7 before the CO₂ comes on.
Plant growth has been surprisingly good. I also frequently see the plants pearling, which I wasn’t necessarily expecting from a little no-tech setup like this. The L.heterophylla has been trimmed once.
What has been particularly interesting is how easily plants taken directly from my high-tech tank seem to have transitioned to these very different conditions.
A bladder snail somehow hitchhiked in with the plants. It seems perfectly happy and has already started reproducing.
With the relatively low pH, I suspect much of the measured ammonia is present as the less-toxic ammonium form, which may also explain why the snail seems completely unbothered.
I am starting to see the power of frequent water changes with the lack of algae so far (fingers crossed).
Things I Might Do Differently Next Time
1. Use a less nutrient-rich substrate or cap the aquasoil.For such a small volume of water, APT Feast may simply be more nutrient-rich than necessary. I’m curious to see how things evolve once the bowl matures.
2. Choose a different light.
The light itself works fine, but the built-in timer is frustrating.
If I turn the light on at night just to look at the bowl, it interrupts the timer cycle, and I then have to reset it the following day.
I’m not particularly handy with electrical work, but ideally I’d love a simple light that could just be plugged into a Kasa smart plug and controlled externally.
If anyone has recommendations for a good small bowl light that works that way, let me know.
Overall, though, I’m really enjoying the simplicity of this setup so far.
Looking forward to letting it mature a little more and hopefully adding some red cherry shrimp soon.
17 Replies
·
852 views

Supporting
I Donated 2026
AquaGirls
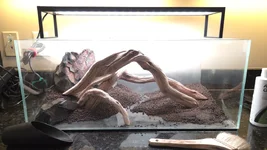
I wasn't quite sure what to do with this tank after it was damaged, as I have been a little concerned with the corner chip that it may leak. My initial thought was to just propagate some mosses in it, or turn it into a small paludarium, as that would not require me to fill it all the way with water. Well, I couldn't help myself. Found some lovely pieces of sturdy Manzanita that worked well together, and the next thing you know, 45lbs of Manten Stone shows up on the door step. Before hitting Aquashella in New Jersey, it was almost through the dark start.
Hardware:
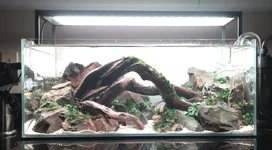
Finished hardscape:
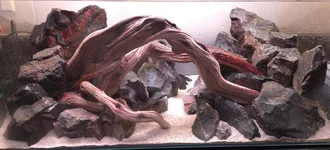
This tank is intended to be slow, and low maintenance. Inspired by Jeff Senske's 'greening' method, this is principally an epiphyte tank, and there are no stems. However, it was a fun challenge to work in a relatively tight space, especially front-to-back, and play with scale.
I drained the tank yesterday, and started planting.
Foreground:
Midground:
Background:
As the tank was in a dark start when the mosses arrived, I tied them to rocks, and dropped them in a tank with CO2 until I was ready to plant. Worked quite well, and was easy to just snip the Terra Line off and transfer the moss to the driftwood when planting. Kept it healthy, and growing. Of course, if I was smart, I would NOT have glued the wood down prior to the dark start. That made tying Fissidens to the wood a bit challenging yesterday, but finally got it done.
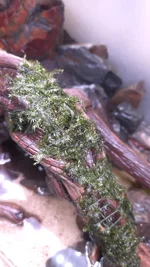
Fissidens fontanus wasn't too bad, as the main arch is elevated a bit more
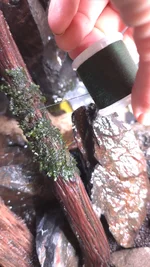
Fissidens crispulus was a bit more tricky on the secondary arch, as that rock was squarely in the way. I noticed that crispulus was already pushing new green tips, as was the notoriously slow growing Miroshaki.
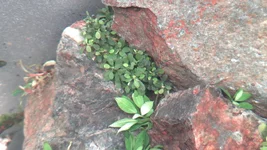
I am not a huge fan of gluing moss or epiphytes, if I can avoid it, mostly because it messes up the hardscape. The majority of the buce and anubias species were simply wedged into crevices in the rocks.
As there was a little exposed aquasoil on the left and right rear flanks, I grabbed the pot of Marsilea minuta I picked up at Aquashella, and stuffed a few in high back corners. I was going to put some HC Cuba back there, and still might, but will be using most of it in the Sensei Stone tank, so didn't want to open the TC just yet. Once I plant that tank, I might sneak a little Cuba into this tank.
I am not sure that a plant can really be adorable, but seriously, Bucephalandra 'Petite Galaxy', next to Anubias Pangolino? This buce is truly teeny tiny, and IF it survives, might be my new favorite detailing plant.
As the Tank is shallow, and the plants are slow, I am starting out at around 28% light intensity while the plants, mostly TC, settle in. Will dose for the next 7 days with Seachem Flourish Advance, and am starting the tank out with APT1.
Here's hoping the plant melting and algae gods are kind!
Hardware:
- ADA Cube Garden 60F (60 x 30 x 25 cm)
- Chihiros WRGB II Slim 60
- Oase Filtosmart 100
- Jardli Lily Pipes (12/16mm)
- GLA Cartridge CO2 Kit
- Ancient Manten Stone (ARC) - 45lbs
- Manzanita (sand blasted) - 4 pieces
- UNS Controsoil Black (normal & fine)
- ADA La Plata Sand
Finished hardscape:
This tank is intended to be slow, and low maintenance. Inspired by Jeff Senske's 'greening' method, this is principally an epiphyte tank, and there are no stems. However, it was a fun challenge to work in a relatively tight space, especially front-to-back, and play with scale.
I drained the tank yesterday, and started planting.
Foreground:
- Bucephalandra Kedagang Japan
- Anubias nana 'Petite'
- Fissidens nobilis
Midground:
- Bucephalandra Lamandau Mini Purple
- Bucephalandra Kedagang 'Round Mini'
- Anubias minima 'Dragon Claw'
- Anubias barteri var. nana 'Mini Coin'
- Fissidens fontanus (Manzanita)
- Fissidens crispulus
Background:
- Bucephalandra 'Petite Blue Chili'
- Bucephalandra 'Petite Galaxy'
- Anubias barteri var. nana 'Pangolino'
- Fissidens Miroshaki
As the tank was in a dark start when the mosses arrived, I tied them to rocks, and dropped them in a tank with CO2 until I was ready to plant. Worked quite well, and was easy to just snip the Terra Line off and transfer the moss to the driftwood when planting. Kept it healthy, and growing. Of course, if I was smart, I would NOT have glued the wood down prior to the dark start. That made tying Fissidens to the wood a bit challenging yesterday, but finally got it done.
Fissidens fontanus wasn't too bad, as the main arch is elevated a bit more
Fissidens crispulus was a bit more tricky on the secondary arch, as that rock was squarely in the way. I noticed that crispulus was already pushing new green tips, as was the notoriously slow growing Miroshaki.
I am not a huge fan of gluing moss or epiphytes, if I can avoid it, mostly because it messes up the hardscape. The majority of the buce and anubias species were simply wedged into crevices in the rocks.
As there was a little exposed aquasoil on the left and right rear flanks, I grabbed the pot of Marsilea minuta I picked up at Aquashella, and stuffed a few in high back corners. I was going to put some HC Cuba back there, and still might, but will be using most of it in the Sensei Stone tank, so didn't want to open the TC just yet. Once I plant that tank, I might sneak a little Cuba into this tank.
I am not sure that a plant can really be adorable, but seriously, Bucephalandra 'Petite Galaxy', next to Anubias Pangolino? This buce is truly teeny tiny, and IF it survives, might be my new favorite detailing plant.
As the Tank is shallow, and the plants are slow, I am starting out at around 28% light intensity while the plants, mostly TC, settle in. Will dose for the next 7 days with Seachem Flourish Advance, and am starting the tank out with APT1.
Here's hoping the plant melting and algae gods are kind!
3 Replies
·
72 views

Journal Farmer D. Singh's journal
Ive reorganized the order of my tanks so I can better keep track of them ie. Tank 2 moss tank is now tank 3. This helps in any confusion I had when tracking tanks they are in a sort of order now. Rather than taking time editing my old journal id rather create a new thread. Pics will be current (for the most part) as they are posted. I am not aquascaping. I am just farming.
74 Replies
·
4138 views