
Welcome to ScapeCrunch
We are ScapeCrunch, the place where planted aquarium hobbyists come to build relationships and support each other. When you're tired of doom scrolling, you've found your home here.
Social Feed

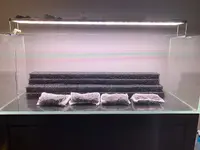
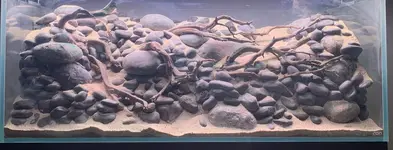
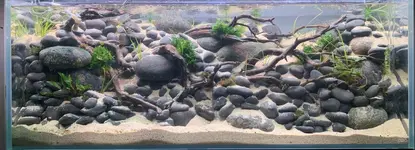
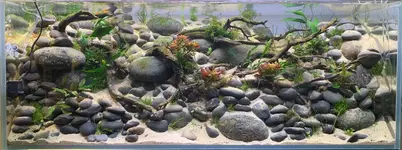
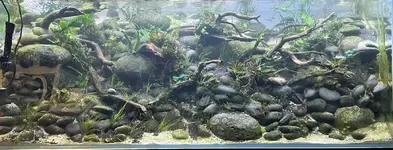
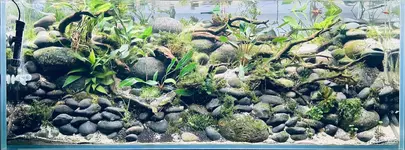
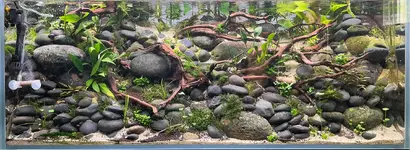
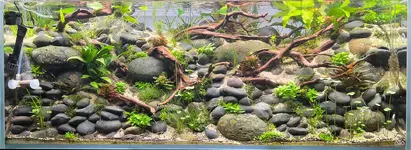
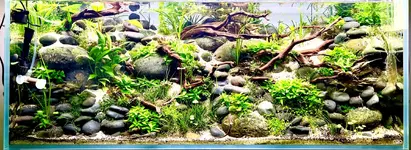
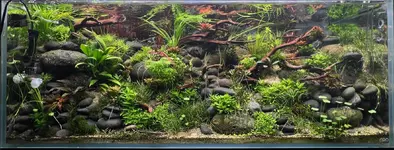
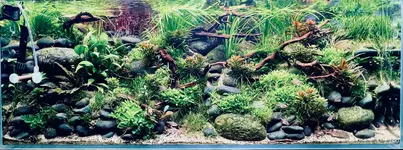
Here is the last layout I created before taking some time off this year due to a new job and the craziness of Dad life.
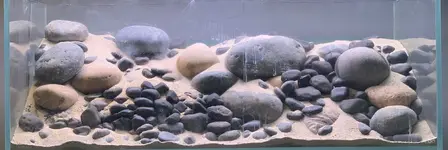
The concept and intent of this layout is centered around a flowing river, with smooth stones, and a more dense planting scheme. I wanted to include some emerged plants to create a river bank feel at some of the edges and upper column areas. I did do this but ended up moving those plants around before removing most of them all together.
I am averse to using a lot of glue during the hardscape phase. One reason is due to the fact that I have some kind of allergy to the stuff (I get headcold and flu like symptoms for two days). More importantly, I have the opinion that hardscape heavy layouts take us away from dense, plant heavy layouts that I believe are the truest form of the hobby. When I see an amazing mountain hardscape, I wonder, what room was left for the plants? I tried to keep this in mind as I began gluing stones together so the round stones wouldn't slip and fall. It was unbelievably difficult to get them to stay in the form I created. They wanted to roll forward, and did many times. The 45cm of depth, with hardscape banked extremely vertical became difficult to work with and I probably came pretty close to shattering the front glass. I ended up gluing some of the hardscape to the side panels but when I broke down the tank the glue came off no problem, surprisingly!
This hardscape left little room for aquasoil and to make matters worse, I used entirely too much sand within the stone work. I did this because whenever I use less aquasoil I usually have less algae issues, probably due to less ammonia spike in the water column. I knew right away with the hardscape and sand to soil ratio I was going to have a problem with root feeders and the type of plants I wanted to add, even if I added root tabs.
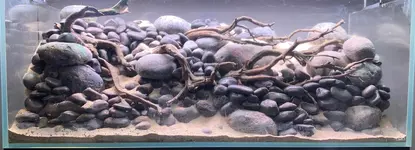
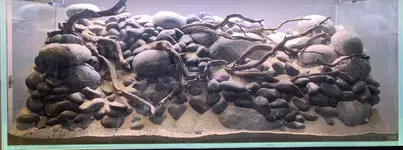
For a layout like this, the 45cm depth is less than advantageous to say the least. I wanted the the river to have a depth vertically, meaning the river is deep, as well as depth in terms of perspective, toward the back of the layout. My intention was to create a shoreline feel at the back, with a bank of emerged plants and grasses. The layout has a flattness, to it due to the wood arrangement, final planting scheme, and abandoning of the top back that I think I could have done a better job with.
The final two photos in this series aren't too bad but it totally missed the mark for me in terms of what I was going for. Right after those photos, I gave the layout what was supposed to be the final trim. I then went to get some fish, but could not find the right fish for this layout after visiting 3 stores. I have fish in the tank but you can't see them. I wanted to get some very red fish (like a cherry barb). Unfortunately, I was up against a very hard stop. We had a trip to Europe planned. It was now or never to find fish, take a photo, and submit, but when I looked at the tank after the trim, I realized it needed to recover more. I decided to withdraw the scape from competition entry because I didn't have a final photo with fish and dense growth.
Other smaller issues were things like bad emerged plant health, wonky stone work, and BGA issues. Some layouts surprise you with how easy they go in terms of algae, others really challenge you.
I want to come back to this concept with a new aquarium I have on the way that has deeper dimensions. It won't be the next layout I go for, but I definitely want to revisit it. I have plans for next year's contest already. Anyways I hope you enjoy a look at this and happy scaping.
The concept and intent of this layout is centered around a flowing river, with smooth stones, and a more dense planting scheme. I wanted to include some emerged plants to create a river bank feel at some of the edges and upper column areas. I did do this but ended up moving those plants around before removing most of them all together.
I am averse to using a lot of glue during the hardscape phase. One reason is due to the fact that I have some kind of allergy to the stuff (I get headcold and flu like symptoms for two days). More importantly, I have the opinion that hardscape heavy layouts take us away from dense, plant heavy layouts that I believe are the truest form of the hobby. When I see an amazing mountain hardscape, I wonder, what room was left for the plants? I tried to keep this in mind as I began gluing stones together so the round stones wouldn't slip and fall. It was unbelievably difficult to get them to stay in the form I created. They wanted to roll forward, and did many times. The 45cm of depth, with hardscape banked extremely vertical became difficult to work with and I probably came pretty close to shattering the front glass. I ended up gluing some of the hardscape to the side panels but when I broke down the tank the glue came off no problem, surprisingly!
This hardscape left little room for aquasoil and to make matters worse, I used entirely too much sand within the stone work. I did this because whenever I use less aquasoil I usually have less algae issues, probably due to less ammonia spike in the water column. I knew right away with the hardscape and sand to soil ratio I was going to have a problem with root feeders and the type of plants I wanted to add, even if I added root tabs.
For a layout like this, the 45cm depth is less than advantageous to say the least. I wanted the the river to have a depth vertically, meaning the river is deep, as well as depth in terms of perspective, toward the back of the layout. My intention was to create a shoreline feel at the back, with a bank of emerged plants and grasses. The layout has a flattness, to it due to the wood arrangement, final planting scheme, and abandoning of the top back that I think I could have done a better job with.
The final two photos in this series aren't too bad but it totally missed the mark for me in terms of what I was going for. Right after those photos, I gave the layout what was supposed to be the final trim. I then went to get some fish, but could not find the right fish for this layout after visiting 3 stores. I have fish in the tank but you can't see them. I wanted to get some very red fish (like a cherry barb). Unfortunately, I was up against a very hard stop. We had a trip to Europe planned. It was now or never to find fish, take a photo, and submit, but when I looked at the tank after the trim, I realized it needed to recover more. I decided to withdraw the scape from competition entry because I didn't have a final photo with fish and dense growth.
Other smaller issues were things like bad emerged plant health, wonky stone work, and BGA issues. Some layouts surprise you with how easy they go in terms of algae, others really challenge you.
I want to come back to this concept with a new aquarium I have on the way that has deeper dimensions. It won't be the next layout I go for, but I definitely want to revisit it. I have plans for next year's contest already. Anyways I hope you enjoy a look at this and happy scaping.
2 Replies
·
1283 views


Supporting
I Donated 2026
Rockstar
Anybody else stay up late to watch the IAPLC rankings. As usual, my choices would have been different. Some scapes ranked in the 40s got picked by some judges as the best, so at least I'm not alone in that. Highest ranking by a U.S. contestant was Ryan Noel at, I believe, 31. Congrats to Ryan.
5 Replies
·
72 views

I Donated 2026
I wanted to share my experience so far with a cheap flow meter from Aliexpress.
I am generally a “you get what you pay for” aquarist, but I have taken a gamble due to circumstances. It is still early days, but it feels like it may have paid off.
Looking to add a flow meter to help tune my CO2 in a newly set up 130L tank, I searched far and wide for the different options. They were few and far between, most were for far larger flows than I needed and those that were appropriate were ridiculously expensive to get to Australia. So I went searching on the various Chinese discount sites and came across the LZB-3WB flow meters. They are cheap… real cheap. Less than $30 Australian landed, which made me nervous, but felt it was worth a shot at that price.
Not knowing what flow ranges I would need I ordered a 6-60ml/minute model.
After installing it, it was clearly too high of a range for my tank, but it did allow for some visibility while adjusting CO2. It was certainly better than a bubble counter.
Here is a picture of it action:

As you can see, the reading is below the scale of the meter, but with a marker I could at least set a starting point as I adjusted my CO2 higher. Also the adjustment valve was useless, a tiny turn would shut the flow off or open it to max out the meter.
I ordered the below as a replacement:

2.5-25ml/minute seems like a good range for my tank.
As a bonus the valve is better than most standard regulator needle valves. I can adjust the flow in increments of about 1ml/minute.
Below is the valve in action:

They have been in service for 2 months total now, 1 month each, so still an early review. It has been a solid upgrade though and was an easy install. They come with big 8mm barbed fittings but they can be unscrewed to reveal 1/8 female threads that standard needle valves for aquariums fit. I have also got some 1/8 to push fit fittings that I am yet to install as I am heading away on holiday for 2 weeks soon and don’t want to make any changes for the house-sitters to potentially have to fix!
Pros: adjusting my CO2 was made so much easier by being able to see exactly how much of an increase I was making with each adjustment. Monitoring that the valve isn’t drifting has been easy also, a quick check of the meter tells me it is steady.
Cons: I doubt that the reading is accurate. This means little to me, as I am not using it for a calculation or comparison between tanks. As long as the reading is consistent, even if it is wrong, I am fine with that. Also, the max pressure is listed as 40psi. I am unsure if that is a failure or accuracy maximum. Again, it doesn’t affect me as I run a low regulator pressure due to using a reactor. If I were using a diffuser that needed a high pressure, it may make me nervous.
As always, with any cheap gear, your mileage may vary. But, I thought it was worth sharing as it may help those with limited access to flow meters of appropriate sizes. So far it is proving to be the second best $25 I have spent on this tank, second only to the super red bristlenose I have in the tank.
I am generally a “you get what you pay for” aquarist, but I have taken a gamble due to circumstances. It is still early days, but it feels like it may have paid off.
Looking to add a flow meter to help tune my CO2 in a newly set up 130L tank, I searched far and wide for the different options. They were few and far between, most were for far larger flows than I needed and those that were appropriate were ridiculously expensive to get to Australia. So I went searching on the various Chinese discount sites and came across the LZB-3WB flow meters. They are cheap… real cheap. Less than $30 Australian landed, which made me nervous, but felt it was worth a shot at that price.
Not knowing what flow ranges I would need I ordered a 6-60ml/minute model.
After installing it, it was clearly too high of a range for my tank, but it did allow for some visibility while adjusting CO2. It was certainly better than a bubble counter.
Here is a picture of it action:
As you can see, the reading is below the scale of the meter, but with a marker I could at least set a starting point as I adjusted my CO2 higher. Also the adjustment valve was useless, a tiny turn would shut the flow off or open it to max out the meter.
I ordered the below as a replacement:
2.5-25ml/minute seems like a good range for my tank.
As a bonus the valve is better than most standard regulator needle valves. I can adjust the flow in increments of about 1ml/minute.
Below is the valve in action:
They have been in service for 2 months total now, 1 month each, so still an early review. It has been a solid upgrade though and was an easy install. They come with big 8mm barbed fittings but they can be unscrewed to reveal 1/8 female threads that standard needle valves for aquariums fit. I have also got some 1/8 to push fit fittings that I am yet to install as I am heading away on holiday for 2 weeks soon and don’t want to make any changes for the house-sitters to potentially have to fix!
Pros: adjusting my CO2 was made so much easier by being able to see exactly how much of an increase I was making with each adjustment. Monitoring that the valve isn’t drifting has been easy also, a quick check of the meter tells me it is steady.
Cons: I doubt that the reading is accurate. This means little to me, as I am not using it for a calculation or comparison between tanks. As long as the reading is consistent, even if it is wrong, I am fine with that. Also, the max pressure is listed as 40psi. I am unsure if that is a failure or accuracy maximum. Again, it doesn’t affect me as I run a low regulator pressure due to using a reactor. If I were using a diffuser that needed a high pressure, it may make me nervous.
As always, with any cheap gear, your mileage may vary. But, I thought it was worth sharing as it may help those with limited access to flow meters of appropriate sizes. So far it is proving to be the second best $25 I have spent on this tank, second only to the super red bristlenose I have in the tank.
33 Replies
·
2343 views


Rockstar
I mention this plant on occasion, but no one ever comments. So I thought I'd make a post for others and me for future reference.
It is my favorite Erio. It is a darker green, doesn't get too big, and for me it has never sent up any seed stalks.
I find it easy to grow. I have high light but nothing crazy at 124PAR and high CO2, 50+ppm. It gets about max 3-4" and makes side daughter plants when large. I'm not sure my dosing scheme is. Sort of an EI daily dosing kind of thing.
What gets me is every autumn, it starts to melt. I'm not sure how it knows it's autumn with consistent light and a heater, but it must get a little cooler in the tank or something. The plant starts to turn brown and sends up (I'm not sure of the correct term) vegetative stalks with little plantlets on the ends. I've found you can plant these stalks into the substrate with the plantlet on top, and it will grow into a new plant. They've been easy to grow. This is the third year this has happened to me.
Pic of plantlets below. I'll try to get a better one sometime. All I had time for tonight was a crappy phone pic.
This year I divided one of the mother plants in hopes that it wouldn't fully melt and would regrow. That is still in progress.
Anyone else's experiences are welcome.
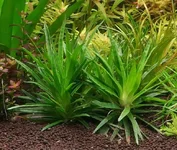
This plant is the same plant as the one on the right above.

It is my favorite Erio. It is a darker green, doesn't get too big, and for me it has never sent up any seed stalks.
I find it easy to grow. I have high light but nothing crazy at 124PAR and high CO2, 50+ppm. It gets about max 3-4" and makes side daughter plants when large. I'm not sure my dosing scheme is. Sort of an EI daily dosing kind of thing.
What gets me is every autumn, it starts to melt. I'm not sure how it knows it's autumn with consistent light and a heater, but it must get a little cooler in the tank or something. The plant starts to turn brown and sends up (I'm not sure of the correct term) vegetative stalks with little plantlets on the ends. I've found you can plant these stalks into the substrate with the plantlet on top, and it will grow into a new plant. They've been easy to grow. This is the third year this has happened to me.
Pic of plantlets below. I'll try to get a better one sometime. All I had time for tonight was a crappy phone pic.
This year I divided one of the mother plants in hopes that it wouldn't fully melt and would regrow. That is still in progress.
Anyone else's experiences are welcome.
This plant is the same plant as the one on the right above.
8 Replies
·
247 views

Staff member
I Donated 2026
Founding Member
Hello Welcome, justtankin
Welcome to ScapeCrunch, @justtankin!
We would love to get to know you. Please tell us about yourself. What tank do you have?
We would love to get to know you. Please tell us about yourself. What tank do you have?
0 Replies
·
14 views
Staff member
I Donated 2026
Founding Member
This month's theme is: plant, hardscape and fish
This one is going to be tough but I hope some of you take up the challenge. Take a picture that captures a plant, some hardscape and at least one fish in the same picture.
Be as artistic and creative as you like.
The rules:
A $25 store credit from BurrAqua thanks to @Burr740!

This one is going to be tough but I hope some of you take up the challenge. Take a picture that captures a plant, some hardscape and at least one fish in the same picture.
Be as artistic and creative as you like.
The rules:
- Submissions are allowed between October 7 and October 23.
- Voting will start on October 23 at 12:01 am Eastern time.
- Voting will end on October 31 at 11:30 pm Eastern time.
A $25 store credit from BurrAqua thanks to @Burr740!
6 Replies
·
285 views
Staff member
I Donated 2026
Founding Member
Hello Welcome, liamcsail
Welcome to ScapeCrunch, @liamcsail!
We would love to get to know you. Please tell us about yourself. What tank do you have?
We would love to get to know you. Please tell us about yourself. What tank do you have?
0 Replies
·
16 views

Rockstar
Journal 22 gallon long bookshelf
Time to start a new thread.
I’ll fill in some details later, but I’m working on the hardscape now. Any and all criticism is appreciated. The vision is nothing more, and nothing less, than something appealing to the eye.
90cm x 30cm x 30cm Lifegard Aquatics ultra clear bookshelf tank. Buce and anubias on the hardscape, stems towards the back and center, mid to front carpet with some changes in shade and texture down to a flat grade on the right side of the tank.
Lily pipe inlet and skimmer will be in the back left corner with the outflow in the front left to hopefully achieve circular flow. I’ll be running an in-line diffuser. Light will be the P600 Pro that I regrettably did not upside to 900. Oh well. I’ll mount it high and hopefully it’ll have enough spread.
I have some dragon stone and red lava rock rubble I’ll use at the base to blend into the substrate, as well as some stratum I may or may not cap with.


I’ll fill in some details later, but I’m working on the hardscape now. Any and all criticism is appreciated. The vision is nothing more, and nothing less, than something appealing to the eye.
90cm x 30cm x 30cm Lifegard Aquatics ultra clear bookshelf tank. Buce and anubias on the hardscape, stems towards the back and center, mid to front carpet with some changes in shade and texture down to a flat grade on the right side of the tank.
Lily pipe inlet and skimmer will be in the back left corner with the outflow in the front left to hopefully achieve circular flow. I’ll be running an in-line diffuser. Light will be the P600 Pro that I regrettably did not upside to 900. Oh well. I’ll mount it high and hopefully it’ll have enough spread.
I have some dragon stone and red lava rock rubble I’ll use at the base to blend into the substrate, as well as some stratum I may or may not cap with.
301 Replies
·
34062 views

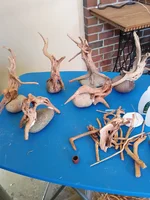
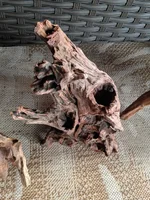
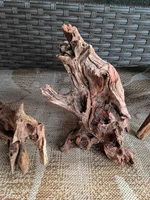
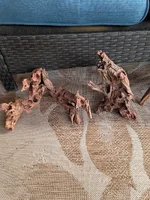
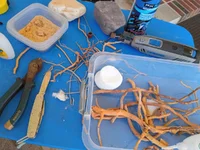
Got on the tree build kick in past 2 weeks to make somthing I like for 36g freebie build to replace the huge tree turd #2 in there. I got 6 stumps ready today to get built for smaller tanks, 3 done today 3 waiting. Built the larger 17 tall 16 wide tree pics added other day to journal but gonna a build 2-3 more larger trees and the 6 smaller. Sell the ones off on eBay and etsy I don't want.
The larger stump 2nd post pic s 16" tall 15 wide plan to use in future scapes smaller. I've been using Amazon branch packs 15.00 for 25-35 pieces and amazon spiderwood 6-8" 5 for 12.00 for small trees. The large tree I made was a 10.99 piece I tore apart and used the 3 larger branches and built onto them to get the large tree in added pics cost me in end around 22.00 .... I have 10 pieces coming in mail Friday 5 large and 5 medium all spiderwood to make larger trees with this weekend.
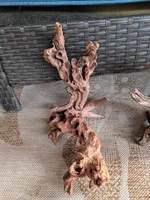
Bought a ton of Amazon wood on Amazon lol 2 for 17.00 10-14" so I glued some of them together for larger usable pieces. some came out cool and well worth the 17.00 for the pieces glued together.The 1 has natural plant pots on top. The v shape last 2 pics 12" deep and 16" wide
After literally glueing a finger to a rock today Imao I quit! I ended up used all the accelerator I had anyway so Friday or sat before I can finish my smaller trees. will update as it goes, It will be a forest of trees when its done.
The larger stump 2nd post pic s 16" tall 15 wide plan to use in future scapes smaller. I've been using Amazon branch packs 15.00 for 25-35 pieces and amazon spiderwood 6-8" 5 for 12.00 for small trees. The large tree I made was a 10.99 piece I tore apart and used the 3 larger branches and built onto them to get the large tree in added pics cost me in end around 22.00 .... I have 10 pieces coming in mail Friday 5 large and 5 medium all spiderwood to make larger trees with this weekend.
Bought a ton of Amazon wood on Amazon lol 2 for 17.00 10-14" so I glued some of them together for larger usable pieces. some came out cool and well worth the 17.00 for the pieces glued together.The 1 has natural plant pots on top. The v shape last 2 pics 12" deep and 16" wide
After literally glueing a finger to a rock today Imao I quit! I ended up used all the accelerator I had anyway so Friday or sat before I can finish my smaller trees. will update as it goes, It will be a forest of trees when its done.
8 Replies
·
191 views
Journal High-Tech 90P Build
Hi guys!
I'm new here, but not entirely new to planted tanks though I've been out of the hobby for the better part of the last decade between kids and moving a couple of times - but finally in a spot where I can do something again. I'm mostly going to be making things up as I go along, but plan on a lot of automation (I want to integrate everything into home assistant) and a lot of DIY as I love the challenge of building things out myself.
The starting point:
I picked up a 90P rimless, low-iron tank on a great deal.
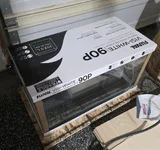
I have a rough idea in my head for a stand to be built from plywood - just have a couple other house projects to finish off before starting that built.
Wife says I can only have one aquarium, so for this tank, I want to go all out with a sump to allow for auto top off, and auto water changes, auto fertilizer dosing etc. etc. I have half a plan in my mind.
I've also started on the light fixture which I've modeled up in CAD, and plan on making out of an 8020 extrusion, and some 3D printed bits.
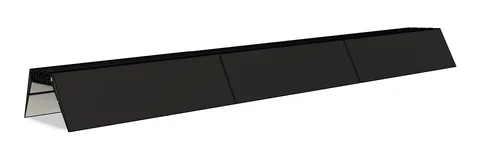
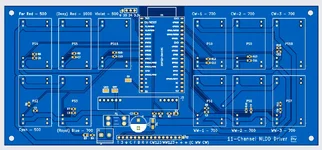
I'm using bridgelux gen 3 thrive CW (3000k) and WW (5000k) LED strips which have super high CRI at 98+ along with some specific XPE2 wavelengths that I'll solder onto some starboards. Far Red (730nm), Red (654nm), Cyan (495nm), Blue (455nm), Visible UV (415nm). Each segment of the white channels will be on its own driver so I can adjust left to right brightness in thirds, and each colour channel on its own driver so I can vary each channel on a time-based approach.
These will be run from a custom PCB board with Meanwell N-LDD drivers, and will run ESPHome on an ESP32 so it can link up with my Home Assistant installation.
That's it for now, this will probably be a very slow build so be warned if you follow along!
I'm new here, but not entirely new to planted tanks though I've been out of the hobby for the better part of the last decade between kids and moving a couple of times - but finally in a spot where I can do something again. I'm mostly going to be making things up as I go along, but plan on a lot of automation (I want to integrate everything into home assistant) and a lot of DIY as I love the challenge of building things out myself.
The starting point:
I picked up a 90P rimless, low-iron tank on a great deal.
I have a rough idea in my head for a stand to be built from plywood - just have a couple other house projects to finish off before starting that built.
Wife says I can only have one aquarium, so for this tank, I want to go all out with a sump to allow for auto top off, and auto water changes, auto fertilizer dosing etc. etc. I have half a plan in my mind.
I've also started on the light fixture which I've modeled up in CAD, and plan on making out of an 8020 extrusion, and some 3D printed bits.
I'm using bridgelux gen 3 thrive CW (3000k) and WW (5000k) LED strips which have super high CRI at 98+ along with some specific XPE2 wavelengths that I'll solder onto some starboards. Far Red (730nm), Red (654nm), Cyan (495nm), Blue (455nm), Visible UV (415nm). Each segment of the white channels will be on its own driver so I can adjust left to right brightness in thirds, and each colour channel on its own driver so I can vary each channel on a time-based approach.
These will be run from a custom PCB board with Meanwell N-LDD drivers, and will run ESPHome on an ESP32 so it can link up with my Home Assistant installation.
That's it for now, this will probably be a very slow build so be warned if you follow along!
74 Replies
·
5416 views

Staff member
I Donated 2026
Founding Member
Hello Welcome, guernsey
Welcome to ScapeCrunch, @guernsey!
We would love to get to know you. Please tell us about yourself. What tank do you have?
We would love to get to know you. Please tell us about yourself. What tank do you have?
0 Replies
·
17 views