
Welcome to ScapeCrunch
We are ScapeCrunch, the place where planted aquarium hobbyists come to build relationships and support each other. When you're tired of doom scrolling, you've found your home here.
Social Feed

Staff member
I Donated 2026
Founding Member
Announcement Garden Style Aquascaping Contest 2023 launched

We are thrilled to announce the launch of the Garden Style Aquascaping Contest for 2023!
Mission
The mission of the contest is to celebrate and promote the beauty of garden style aquascaping. Sometimes called Dutch-inspired, fruit stand or flowerbed, the garden style has been gaining in popularity over the years with its unique and color impact and the skill necessary to execute it well. However, it has been underrepresented in the current aquascaping contests when compared to more established styles like nature aquarium, diorama and others.Important Dates
| Contest launch - | January 1, 2023 |
| Entry submissions - | February 1, 2023 - April 15, 2023 |
| Results - | May 15, 2023 |
Details and more information
The GSAC is completely free to enter and is open to everyone around the world. Best of Show will receive a trophy. First, second and third place winners will receive ribbons.Please see the Garden Style Aquascaping Contest Detailed Guidelines for more information.
We ask for your support by helping us to spread the word about this contest to your networks, clubs and social media. Thank you from all of us at ScapeCrunch!
19 Replies
·
5896 views


Supporting
I Donated 2026
Rockstar
Article Contributor
See this post regarding AR Mini trimming/planting, and this post regarding Cyperus helferi trimming and planting!
I have hardly seen this subject talked about enough, but I think that it's one of the biggest reasons contributing to beginner's algae-filled downfalls! If you're buying plants from big stores like Aquarium Plants Factory (really good btw), Buceplant, etc. 90% of the plants you are receiving are terrestrially-grown.
Here's an important fact about terrestrially-grown aquarium plants
100% of all terrestrial leaves, when submerged under water, for any plant, will eventually get algae and die.
Some can take a while (anubias, java fern, cyperus helferi), while others will either melt (Crypts) or quickly get algae (AR Mini, Staurogyne repens, stem plants, etc)
But what about buying submerged-growth plants? From hobbyists, or BurrAqua, for example?
There is still a chance that your tank's conditions are different enough that many, if not most leaves you plant, will melt/die/attract algae.
How do we fix this? By leaving only enough leaves for the plant to continue to absorb light and put out new growth. Usually the top 4-6 leaves for stem plants.
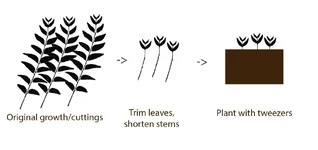
It's a lot of work up front, but you will MAJORLY reduce the amount of waste, DOC 's, and algae-inducing scenarios if you trim your plants before planting.
I've done this in ALL of my tanks in the last 4 years with great success.
The easiest way to do this is with stainless squeeze scissors over your sink:
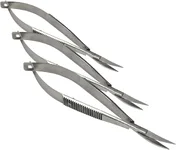
Here's the ones I recommend.
Yes, it takes a ton of patience. But if it could make a big difference in preventing the 2-3 month algae bloom in your tank, would you do it?
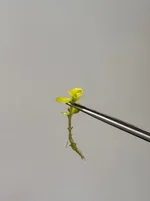
Lysimachia nummularia 'Aurea', only a few top leaves left, 3" of stem.
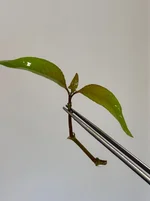
Hygrophila corymbosa. Note how I left the leaf nodes on the stem? That's where roots will grow from. Almost all stem plants need nodes to grow roots, even if you've removed the leaves from them.
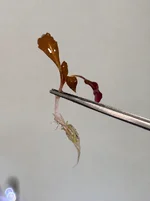
Terrestrially-grown AR 'Mini' from APF. See how I did the same in this thread for my previous tanks.
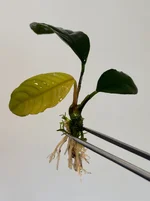
This Anubias barteri var. coffeefolia was grown terrestrially (often called 'emersed' or emergent) in a greenhouse. I removed all but the newest 3 leaves, and trimmed the roots too. Terrestrial roots are quite different from submerged with certain plants.
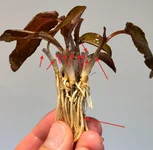
Almost ALL Cryptocoryne species are grown terrestrially. These plants grow as a Rosette, where the inner-most leaves on the "stem" are the freshest, and the outer-most are the oldest. I removed a TON of old terrestrial leaves, leaving just enough for the plant to be able to grow new submerged leaves in my tank as quickly as possible, while leaving as few algae-attracting terrestrial leaves as possible. I also trimmed the roots, which were 5" long upon receiving the plant.

Lobelia cardinalis 'mini'
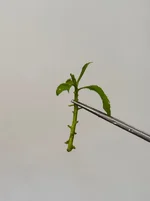
Penthorum sedoides. Would also look very similar for Staurogyne repens, too.
Did you know that Blyxa japonica is actually a stem plant? It looks like a rosette, but it's actually a squat, wide stem plant. The lowest/outermost leaves are the oldest, and even though this is a true aquatic plant with no terrestrial form in nature, I know that it likes to throw a fit and melt a good portion of it's oldest leaves when transitioning to my tank's conditions. Here's what it looked like when I received it from @Burr740:

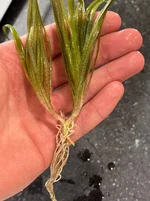
Nice and trimmed up. Less problematic at the 1-2 month mark in the tank's development, I know it!
What about delicate/feather plants?
They're super annoying to prep. I still only keep the top 3-4" max.
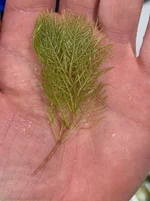
With Myriophyllum mattogrossense 'Golden', I only keep a few inches and still try to remove some of the lower leaves that would otherwise just rot by being buried in my inert sand.

What about Myriophyllum sp. "Roraima"? F*ck that. Nightmare to trim lower leaves, just trim it to 3" (not pictured) and discard the bottom when planting.
Curious what you guys think! I know I could receive plenty of "I've never done this, my tank has been fine" but I'd recommend trying it first before having a strong opinion of it
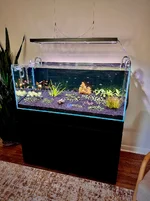
By the way, all plants pictured were actually used in my upcoming 120cm Showcase tank:
I have hardly seen this subject talked about enough, but I think that it's one of the biggest reasons contributing to beginner's algae-filled downfalls! If you're buying plants from big stores like Aquarium Plants Factory (really good btw), Buceplant, etc. 90% of the plants you are receiving are terrestrially-grown.
Here's an important fact about terrestrially-grown aquarium plants
100% of all terrestrial leaves, when submerged under water, for any plant, will eventually get algae and die.
Some can take a while (anubias, java fern, cyperus helferi), while others will either melt (Crypts) or quickly get algae (AR Mini, Staurogyne repens, stem plants, etc)
But what about buying submerged-growth plants? From hobbyists, or BurrAqua, for example?
There is still a chance that your tank's conditions are different enough that many, if not most leaves you plant, will melt/die/attract algae.
How do we fix this? By leaving only enough leaves for the plant to continue to absorb light and put out new growth. Usually the top 4-6 leaves for stem plants.
It's a lot of work up front, but you will MAJORLY reduce the amount of waste, DOC 's, and algae-inducing scenarios if you trim your plants before planting.
I've done this in ALL of my tanks in the last 4 years with great success.
The easiest way to do this is with stainless squeeze scissors over your sink:
Here's the ones I recommend.
Yes, it takes a ton of patience. But if it could make a big difference in preventing the 2-3 month algae bloom in your tank, would you do it?
Here are some specific plant examples:
For most true stem plants, I like to leave 3-4" of stem, trimming roots if necessary, and leaving only 4-6 of the freshest leaves. More than that, they will eventually be algae magnets. Less than that (like 2 leaves only) they might not survive the shock.Lysimachia nummularia 'Aurea', only a few top leaves left, 3" of stem.
Hygrophila corymbosa. Note how I left the leaf nodes on the stem? That's where roots will grow from. Almost all stem plants need nodes to grow roots, even if you've removed the leaves from them.
Terrestrially-grown AR 'Mini' from APF. See how I did the same in this thread for my previous tanks.
This Anubias barteri var. coffeefolia was grown terrestrially (often called 'emersed' or emergent) in a greenhouse. I removed all but the newest 3 leaves, and trimmed the roots too. Terrestrial roots are quite different from submerged with certain plants.
Almost ALL Cryptocoryne species are grown terrestrially. These plants grow as a Rosette, where the inner-most leaves on the "stem" are the freshest, and the outer-most are the oldest. I removed a TON of old terrestrial leaves, leaving just enough for the plant to be able to grow new submerged leaves in my tank as quickly as possible, while leaving as few algae-attracting terrestrial leaves as possible. I also trimmed the roots, which were 5" long upon receiving the plant.
Lobelia cardinalis 'mini'
Penthorum sedoides. Would also look very similar for Staurogyne repens, too.
Did you know that Blyxa japonica is actually a stem plant? It looks like a rosette, but it's actually a squat, wide stem plant. The lowest/outermost leaves are the oldest, and even though this is a true aquatic plant with no terrestrial form in nature, I know that it likes to throw a fit and melt a good portion of it's oldest leaves when transitioning to my tank's conditions. Here's what it looked like when I received it from @Burr740:
Nice and trimmed up. Less problematic at the 1-2 month mark in the tank's development, I know it!
What about delicate/feather plants?
They're super annoying to prep. I still only keep the top 3-4" max.
With Myriophyllum mattogrossense 'Golden', I only keep a few inches and still try to remove some of the lower leaves that would otherwise just rot by being buried in my inert sand.
What about Myriophyllum sp. "Roraima"? F*ck that. Nightmare to trim lower leaves, just trim it to 3" (not pictured) and discard the bottom when planting.
Curious what you guys think! I know I could receive plenty of "I've never done this, my tank has been fine" but I'd recommend trying it first before having a strong opinion of it
By the way, all plants pictured were actually used in my upcoming 120cm Showcase tank:
18 Replies
·
1319 views


Staff member
I Donated 2026
Founding Member
This month's theme is: plant, hardscape and fish
This one is going to be tough but I hope some of you take up the challenge. Take a picture that captures a plant, some hardscape and at least one fish in the same picture.
Be as artistic and creative as you like.
The rules:
A $25 store credit from BurrAqua thanks to @Burr740!

This one is going to be tough but I hope some of you take up the challenge. Take a picture that captures a plant, some hardscape and at least one fish in the same picture.
Be as artistic and creative as you like.
The rules:
- Submissions are allowed between October 7 and October 23.
- Voting will start on October 23 at 12:01 am Eastern time.
- Voting will end on October 31 at 11:30 pm Eastern time.
A $25 store credit from BurrAqua thanks to @Burr740!
8 Replies
·
396 views

Rockstar
Since the tanks have been in such a state of disarray, I’ve been focusing on moving everything to emersed until life sorts itself out.
How I transition from submersed to emersed depends on the growth form of the plant.
Plants that are primarily basal form (not stems) go in square nursery pots with one of two substrates. First choice is long fiber sphagnum (dried and then rehydrated) topped with aquasoil, straight aquasoil, or a mix of peat moss/perlite/coco coir/aquasoil. The sphagnum wicks better than aquasoil. Alternatively, I use straight aquasoil, I line the bottom of the pots with a coffee filter to keep the substrate from falling through. Both work equally well. The bin needs to be filled with a little more water than if dried sphagnum is used which is why the first method is preferable.
The nursery pots are kept in a clear plastic container. Sterilite are the typical go-to, but I actually prefer the tall clear shoe boxes from Walmart. They have built in ventilation holes which is handy because I need to drill holes in the sides of any other container near the lid rim. Ventilation is key.
The shoe boxes are cheap too. I fill the bins as much as possible but a little leftover space is okay.
After filling the bins with pots, I fill all the voids with live sphagnum and fill with enough distilled water to saturate the sphagnum. The sphagnum has antimicrobial properties (so I’ve read, and it seems to check out in practice). This keeps the water from developing algae almost entirely. I dress the tops with live sphagnum too if something needs a little help rooting. Depending on the space, I throw rhizome plants right into the sphagnum as well. They develop excellent root systems and are very easily removed and cleaned when needed compared to conventional soil.
I fertilize everything with a foliar spray of Maxsea 16-16-16 diluted to 1 teaspoon per gallon. It’s a kelp based fertilizer with micronutrients. I highly recommend it.
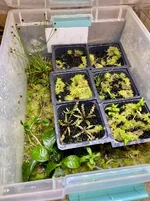
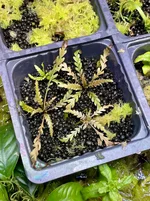
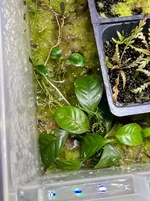
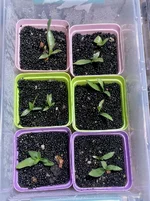
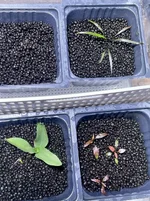
I’ll follow up with emersed stem plant propogation and other methods for the full greenhouse.
How I transition from submersed to emersed depends on the growth form of the plant.
Plants that are primarily basal form (not stems) go in square nursery pots with one of two substrates. First choice is long fiber sphagnum (dried and then rehydrated) topped with aquasoil, straight aquasoil, or a mix of peat moss/perlite/coco coir/aquasoil. The sphagnum wicks better than aquasoil. Alternatively, I use straight aquasoil, I line the bottom of the pots with a coffee filter to keep the substrate from falling through. Both work equally well. The bin needs to be filled with a little more water than if dried sphagnum is used which is why the first method is preferable.
The nursery pots are kept in a clear plastic container. Sterilite are the typical go-to, but I actually prefer the tall clear shoe boxes from Walmart. They have built in ventilation holes which is handy because I need to drill holes in the sides of any other container near the lid rim. Ventilation is key.
The shoe boxes are cheap too. I fill the bins as much as possible but a little leftover space is okay.
After filling the bins with pots, I fill all the voids with live sphagnum and fill with enough distilled water to saturate the sphagnum. The sphagnum has antimicrobial properties (so I’ve read, and it seems to check out in practice). This keeps the water from developing algae almost entirely. I dress the tops with live sphagnum too if something needs a little help rooting. Depending on the space, I throw rhizome plants right into the sphagnum as well. They develop excellent root systems and are very easily removed and cleaned when needed compared to conventional soil.
I fertilize everything with a foliar spray of Maxsea 16-16-16 diluted to 1 teaspoon per gallon. It’s a kelp based fertilizer with micronutrients. I highly recommend it.
I’ll follow up with emersed stem plant propogation and other methods for the full greenhouse.
14 Replies
·
903 views


Staff member
Supporting
Founding Member
Expert in Residence
MOTM Winner
Rockstar
As some people may know I had a long running journal on another forum. Glad to see Art get this new site started. A fresh beginning and loads of possibilities ahead. I'll be updating with thoughts here but for today just wanted to share my latest tank pics.


356 Replies
·
64728 views

Journal Farmer D. Singh's journal
Ive reorganized the order of my tanks so I can better keep track of them ie. Tank 2 moss tank is now tank 3. This helps in any confusion I had when tracking tanks they are in a sort of order now. Rather than taking time editing my old journal id rather create a new thread. Pics will be current (for the most part) as they are posted. I am not aquascaping. I am just farming.
75 Replies
·
4799 views

Got on the tree build kick in past 2 weeks to make somthing I like for 36g freebie build to replace the huge tree turd #2 in there. I got 6 stumps ready today to get built for smaller tanks, 3 done today 3 waiting. Built the larger 17 tall 16 wide tree pics added other day to journal but gonna a build 2-3 more larger trees and the 6 smaller. Sell the ones off on eBay and etsy I don't want.
The larger stump 2nd post pic s 16" tall 15 wide plan to use in future scapes smaller. I've been using Amazon branch packs 15.00 for 25-35 pieces and amazon spiderwood 6-8" 5 for 12.00 for small trees. The large tree I made was a 10.99 piece I tore apart and used the 3 larger branches and built onto them to get the large tree in added pics cost me in end around 22.00 .... I have 10 pieces coming in mail Friday 5 large and 5 medium all spiderwood to make larger trees with this weekend.
Bought a ton of Amazon wood on Amazon lol 2 for 17.00 10-14" so I glued some of them together for larger usable pieces. some came out cool and well worth the 17.00 for the pieces glued together.The 1 has natural plant pots on top. The v shape last 2 pics 12" deep and 16" wide
After literally glueing a finger to a rock today Imao I quit! I ended up used all the accelerator I had anyway so Friday or sat before I can finish my smaller trees. will update as it goes, It will be a forest of trees when its done.
The larger stump 2nd post pic s 16" tall 15 wide plan to use in future scapes smaller. I've been using Amazon branch packs 15.00 for 25-35 pieces and amazon spiderwood 6-8" 5 for 12.00 for small trees. The large tree I made was a 10.99 piece I tore apart and used the 3 larger branches and built onto them to get the large tree in added pics cost me in end around 22.00 .... I have 10 pieces coming in mail Friday 5 large and 5 medium all spiderwood to make larger trees with this weekend.
Bought a ton of Amazon wood on Amazon lol 2 for 17.00 10-14" so I glued some of them together for larger usable pieces. some came out cool and well worth the 17.00 for the pieces glued together.The 1 has natural plant pots on top. The v shape last 2 pics 12" deep and 16" wide
After literally glueing a finger to a rock today Imao I quit! I ended up used all the accelerator I had anyway so Friday or sat before I can finish my smaller trees. will update as it goes, It will be a forest of trees when its done.
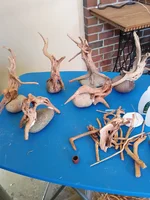
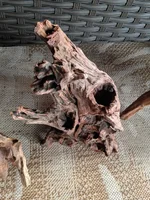
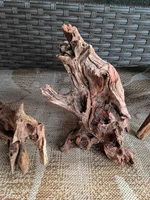
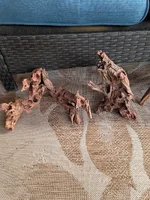
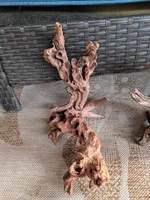
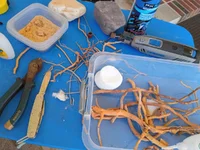
11 Replies
·
274 views

I Donated 2026
Been meaning to write this up for a while, so here it is. Over the last few months I've built a full custom controller setup for my 130L planted, CO2 injected tank, running on three ESP32 boards working together. It replaced an ageing Up Aqua CO2/pH controller and turned into a genuinely complete automation system for water changes, dosing, CO2, top-off, and reservoir monitoring. Sharing the overview here in case it's useful or interesting to anyone else down a similar rabbit hole.
Three boards, each with its own job:
They talk to each other over WiFi and three deliberate hardwired links for the communications that genuinely shouldn't depend on the network as they are safety critical.
Weekly, fully automated. Connect a line from the WaterDrop filter, a drain line that goes outside to the garden or lawn (both with quick connects and manual valves for safety), choose your water change volume in litres, press start and it then:
- runs through safety prompts to ensure everything is connected and safety valves are set correctly.
-prompts to clean prefilters
-prompts to measure remineralisers (calculated on screen, based on your water change volume selection).
-it then drains and refills with RO water. It also turns off/ on smart plugs so skimmers, co2, heaters ect are off for draining then start to turn them on as water fill reaches certain thresholds.
- It doses potassium bicarbonate for KH, calcium and magnesium sulfate for GH, and boosts macros (nitrate, phosphate, potassium, micros), again, all scaled to my actual water change volume.
Everything's logged, every step confirmed before moving to the next, with a wizard-style setup so I can adjust the fill amount, KH target, and anything else on the fly.
I also get phone updates, the fill solenoid is connected with a flow rate sensor, temperature probe and TDS sensor. So every 10L I get an update on the flow rate, tds and temperature of that 10L fill and average so far, so I can spot any issues. It will also abort the water change, stop filter.
I have also put a weight sensor under my CO2 bottle so it tells me how full/empty my co2 bottle is and predicts refill date based on useage (this is untested as it's still so new, I don't have the data for it to be accurate.)
Four channel dosing pump, fully scripted daily doses plus automatic post-water-change boosts, calculated from my actual verified nutrient targets rather than rough guesses. Doses are triggered automatically the moment a water change finishes.
For now, the auto top-off unit itself does the actual work, but the controller now watches the reservoir independently, a proper pressure-based level sensor for the real litre count, plus a simple mechanical float as a dumb, sensor-agnostic backup. If the float ever trips, ATO shuts down immediately and I get a notification, worded differently depending on whether the pressure sensor agrees with the float or not, since a disagreement between the two usually points at the pressure sensor itself needing a look rather than a genuinely empty reservoir. I have some optical sensors on the way, and hopefully by next week the controller is running the ATO independently.
A small but genuinely nice touch. Feeding pauses CO2 injection, filter and skimmer automatically, it's voice activated or you can use a unit mounted button, and the front panel readouts switch to a simple "feeding" display while the filter's off, since the normal sensor numbers would be meaningless with no flow through the lines anyway.
Everything logs to a Grafana dashboard, I have pH, temperature, TDS, reservoir level se sors, it also logs CO2 state, with history of all controller actions that I can actually look back through rather than just a live snapshot. Genuinely useful for spotting slow trends, not just catching sudden problems.
If there's one thing I'd want someone building something similar to take away, it's this. Every automated system that can act on its own needs to fail toward safe, not just work correctly when everything's fine.
A few of the principles that ended up running through the whole build:
The short version
Three boards, each with its own job:
- Water change controller — drains, refills, remineralises, and doses the tank automatically, sitting mostly idle between weekly changes.
- Tank controller — the brains of day-to-day operation, running CO2/pH control, top-off monitoring, the reservoir, and a small front panel with live readouts.
- Alexa bridge — ties the whole thing into Alexa for voice control and equipment scenes, and handles the feeding routine.
They talk to each other over WiFi and three deliberate hardwired links for the communications that genuinely shouldn't depend on the network as they are safety critical.
Water changes
Weekly, fully automated. Connect a line from the WaterDrop filter, a drain line that goes outside to the garden or lawn (both with quick connects and manual valves for safety), choose your water change volume in litres, press start and it then:
- runs through safety prompts to ensure everything is connected and safety valves are set correctly.
-prompts to clean prefilters
-prompts to measure remineralisers (calculated on screen, based on your water change volume selection).
-it then drains and refills with RO water. It also turns off/ on smart plugs so skimmers, co2, heaters ect are off for draining then start to turn them on as water fill reaches certain thresholds.
- during refil it remineralises to target GH and KH from a container with a magnetic stirrer with a perialstatic dosing pump that fires at set percentages of fill.
- it then connects to my Chihiros dosing pumps and fires the dosing boosts to preload nutrients (again these doses are scaled with selected water change volume)
- It doses potassium bicarbonate for KH, calcium and magnesium sulfate for GH, and boosts macros (nitrate, phosphate, potassium, micros), again, all scaled to my actual water change volume.
Everything's logged, every step confirmed before moving to the next, with a wizard-style setup so I can adjust the fill amount, KH target, and anything else on the fly.
I also get phone updates, the fill solenoid is connected with a flow rate sensor, temperature probe and TDS sensor. So every 10L I get an update on the flow rate, tds and temperature of that 10L fill and average so far, so I can spot any issues. It will also abort the water change, stop filter.
CO2 and pH
This was the original reason the whole project started. My old analogue controller had a pretty coarse hysteresis, and in low KH water even small CO2 swings move pH more than I'd like. The new controller runs a proper pH probe on a scheduled window, targets a specific pH with a tight, tunable hysteresis, and logs everything continuously. It also catches things a dumb timer never could, a sudden pH crash with the solenoid already closed pointed straight at a CO2 regulator dumping its tank, something I'd never have caught otherwise until it was a much bigger problem. The Atlas Ezo ph sensor setup is elite and far more accurate than my previous setup. I can also see live updates, get phone alerts for certain events and have set safety alets and shutoffs for events like rapid changes in ph.I have also put a weight sensor under my CO2 bottle so it tells me how full/empty my co2 bottle is and predicts refill date based on useage (this is untested as it's still so new, I don't have the data for it to be accurate.)
Dosing
Being sick of the Chihiros app occasionally being unavailable this year, I have given over control of the scheduling and setup to my controller. I have my own dashboard and phone app that does this now and can send schedules and settings to the Chihiros pumps. It has taken some trial error and bluetooth sniffing apps to work this out but it is rock solid now.Four channel dosing pump, fully scripted daily doses plus automatic post-water-change boosts, calculated from my actual verified nutrient targets rather than rough guesses. Doses are triggered automatically the moment a water change finishes.
Top-off and reservoir
For now, the auto top-off unit itself does the actual work, but the controller now watches the reservoir independently, a proper pressure-based level sensor for the real litre count, plus a simple mechanical float as a dumb, sensor-agnostic backup. If the float ever trips, ATO shuts down immediately and I get a notification, worded differently depending on whether the pressure sensor agrees with the float or not, since a disagreement between the two usually points at the pressure sensor itself needing a look rather than a genuinely empty reservoir. I have some optical sensors on the way, and hopefully by next week the controller is running the ATO independently.
Feeding
A small but genuinely nice touch. Feeding pauses CO2 injection, filter and skimmer automatically, it's voice activated or you can use a unit mounted button, and the front panel readouts switch to a simple "feeding" display while the filter's off, since the normal sensor numbers would be meaningless with no flow through the lines anyway.
Remote monitoring
Everything logs to a Grafana dashboard, I have pH, temperature, TDS, reservoir level se sors, it also logs CO2 state, with history of all controller actions that I can actually look back through rather than just a live snapshot. Genuinely useful for spotting slow trends, not just catching sudden problems.
Alexa integration
Voice control for scenes around water changes, changing settings and feeding, equipment turning off and on automatically at the right points in each process, and a physical feed button that fires the exact same routine as the voice command.Safety, and why it mattered more than any single feature
If there's one thing I'd want someone building something similar to take away, it's this. Every automated system that can act on its own needs to fail toward safe, not just work correctly when everything's fine.
A few of the principles that ended up running through the whole build:
- Solenoids fail closed. Power loss means CO2 and water stay off, never on, by hardware design, not firmware logic that could have a bug in it.
- A tripped safety condition can't be quietly dismissed. If something raises an alert, like the backup float, you can acknowledge it, but the system won't let you clear it while the actual problem is still physically present. No accidentally waving away a real fault.
- The one link that has to work regardless of WiFi, does. CO2 and ATO pausing during a water change runs over a direct hardwired connection between boards, not the network. Everything else can be a bit more relaxed about connectivity; that one thing can't be.
- A backup sensor's only job is to disagree usefully. The float switch isn't there to be a second source of truth, it's there to catch the primary sensor being wrong. When they disagree, the alert tells me which one to actually go check.
- Never power anything from two sources at once. Learned that one the hard way, destroyed a board's regulator early on doing exactly that. So it now has wifi firmware updates for each board, to save the USB input power when updating by PC
None of this was designed perfectly the first time either, more caught through actually running it and paying attention than getting it right on paper up front. A few genuine bugs this build taught me: features that were fully coded but sitting behind a switch I'd forgotten to flip on, so they looked complete but never actually ran; a menu screen that could lose progress if you walked away at the wrong moment during a slow calibration step. Both fixed once they showed up in real use, which is really the whole point of building it in stages rather than all at once and hoping. I have spent weeks finding and squashing bugs before I have given over control of the tank to it.
Next on the list:
Heater/fan control, full ATO control, uninteruptable power unit uninterruptible that alerts me to power outages and turns on air pumps.
It is also in a pretty basic case and the cutouts are purposely oversized. I have ordered smoked acrylic to 'wrap' it in so it appears to be black rectangular box, with only the LED parameter readouts (temp, pH, TDS and ATO reservoir litres) visible through the smoke tinted acrylic and the two black control knobs that wake sleeping OLED screens, all other controls will be behind hinged flaps. I want to make sure all the sensors etc are wired correctly though before I wrap and anchor wiring.
The great thing is, every time I think of something I want to add, it is a coding session with the help of AI and finding the sensors or equipement required. I can wake up with an idea and genuinely have it implemented with an hour or two of soldering and coding. It fits my tank like a glove and is infinitely adaptable. menu setup and setting options all added as I think of them!
I will add some pictures below of the in progress build! I wanted to share in case anyone is thinking of doing the same, with the prices of ESP32s and the sensors (except for the Atlas Ezo chips! which are expensive but well worth it!) it is definitely a project in reach of anyone with a basic idea of code and soldering.
30 Replies
·
1648 views

Supporting
I Donated 2026
Rockstar
When I was walking around Aquashella Chicago, I crossed paths multiple times with Logan Rando while he was filming. I was wondering if he had posted a video of the show yet so I checked out his channel. No video of Chicago yet, so I instead watched his video of New Jersey. About half way through the video, Father Fish rolls by on his scooter and announces he'll be making an announcement that will destroy the tropical fish industry. LOL! I didn't know Father Fish was actually a speaker at Aquashella. Seems funny that a guy who preaches about not giving money to the aquarium industry was invited to speak. I figured WTH, I'll bite and go to his channel to see what the big news was. I couldn't bring myself to watch the whole thing, but I did scan through it and still don't know what the big Earth shattering news was. Just the same ole preachy stuff and I regret destroying the brain cells. I have to be more careful of that, as I'm older and can't afford to lose many more. I'm sure glad my path into this hobby was seeing the work of Takashi Amano, other knowledgeable aquascapers, and all the great folks in this community.
23 Replies
·
720 views

Staff member
I Donated 2026
Founding Member
Question of the Day Hobby Hacks - your best tips, tricks and time-savers!
If you've been in the aquarium hobby for a while, I'm sure you've created or picked up so valuable hacks that fall into the tips, tricks and time-savers categories. So, in an effort to compile and share them, let's post them here.
This site is about sharing knowledge and experiences so don't be shy, no hack is too small or silly.
Please post yours.

This site is about sharing knowledge and experiences so don't be shy, no hack is too small or silly.
Please post yours.
79 Replies
·
9691 views
Rockstar
Journal 22 gallon long bookshelf
Time to start a new thread.
I’ll fill in some details later, but I’m working on the hardscape now. Any and all criticism is appreciated. The vision is nothing more, and nothing less, than something appealing to the eye.
90cm x 30cm x 30cm Lifegard Aquatics ultra clear bookshelf tank. Buce and anubias on the hardscape, stems towards the back and center, mid to front carpet with some changes in shade and texture down to a flat grade on the right side of the tank.
Lily pipe inlet and skimmer will be in the back left corner with the outflow in the front left to hopefully achieve circular flow. I’ll be running an in-line diffuser. Light will be the P600 Pro that I regrettably did not upside to 900. Oh well. I’ll mount it high and hopefully it’ll have enough spread.
I have some dragon stone and red lava rock rubble I’ll use at the base to blend into the substrate, as well as some stratum I may or may not cap with.


I’ll fill in some details later, but I’m working on the hardscape now. Any and all criticism is appreciated. The vision is nothing more, and nothing less, than something appealing to the eye.
90cm x 30cm x 30cm Lifegard Aquatics ultra clear bookshelf tank. Buce and anubias on the hardscape, stems towards the back and center, mid to front carpet with some changes in shade and texture down to a flat grade on the right side of the tank.
Lily pipe inlet and skimmer will be in the back left corner with the outflow in the front left to hopefully achieve circular flow. I’ll be running an in-line diffuser. Light will be the P600 Pro that I regrettably did not upside to 900. Oh well. I’ll mount it high and hopefully it’ll have enough spread.
I have some dragon stone and red lava rock rubble I’ll use at the base to blend into the substrate, as well as some stratum I may or may not cap with.
302 Replies
·
34190 views